
How to have guests sign your rental contract with Tally
Updated
You can have every guest sign your rental contract before arrival without a separate e-signature tool. Put the contract and a signature field in a free Tally form, connect the form to Nowistay and send it with your automatic messages. When the guest signs, Nowistay marks the booking as signed and your messages adapt: a reminder only while the contract is unsigned, the access instructions only once it is signed.
This guide is one use of the Tally integration. It gives the settings for a contract; the Tally guide details each screen.
What you get
- A personal signing link for each booking, sent automatically after the booking.
- “Contract signed” on the booking, usually a few seconds after the guest signs.
- Reminders only to guests who have not signed yet.
- Access instructions held until the contract is signed.
- The signed contracts in your Tally account: each response keeps the guest’s answers and signature.
Before you start
- The AI Channel Manager subscription, with your properties connected through Nowistay PMS: integrations are only available on those properties.
- A Tally account. The free plan includes the signature field.
- Your Tally account connected to Nowistay, as shown in Step 2 of the Tally guide.
- Your contract: its text, or a link to the contract online (for example a PDF).
Step 1: Create the contract form in Tally
In Tally, create a form named, for example, “Rental contract”:
- Paste the text of your contract in the form, or add a link to it.
- Add a short answer question for the guest’s full name.
- Add a required checkbox: “I have read and accept the rental contract”.
- Type /signature and insert the Electronic signature block. Adjust its label if needed (for example “Your signature”).
- Make the signature required: click the ⋮⋮ icon to the left of the block and set it as required, or press Cmd/Ctrl + Shift + R.
- Click Publish.
With a required signature, the form cannot be sent unsigned: on the booking, “submitted” always means “signed”.
Step 2: Connect the form in Nowistay
- Click Integrations in the sidebar, open the Tally row and click Configure.
- In the Tally forms panel, click Connect a form.
- In Tally form, choose “Rental contract”.
- Set the Identifier to contract. Your message variable becomes
{{form.contract}}. The identifier cannot be changed later. - Set the Booking parameter name to “Contract signed”.
- Under Properties, select the properties that use this contract, or leave the field empty to use it on all of them.
- Click Connect the form, then Add the field when Nowistay offers to add the hidden booking reference to your form.
The form now shows Ready in the list of connected forms.
Step 3: Send the contract after the booking
Click Automations in the sidebar. On the Guest Messages row, click Manage messages, then Add message. In Message body, click Insert variable and pick {{form.contract}} in the Forms group.
- Trigger event: Booking Confirmed
- Timing (hours): 0, After the event
- Message body: “Hi
{{guest_first_name}}, thank you for booking{{property_name}}! Please read and sign our rental contract before your arrival, it takes 2 minutes:{{form.contract}}”
Always send the contract through this variable, never the public Tally link: a form opened from the public link cannot be linked to a booking.
Step 4: Remind guests who have not signed
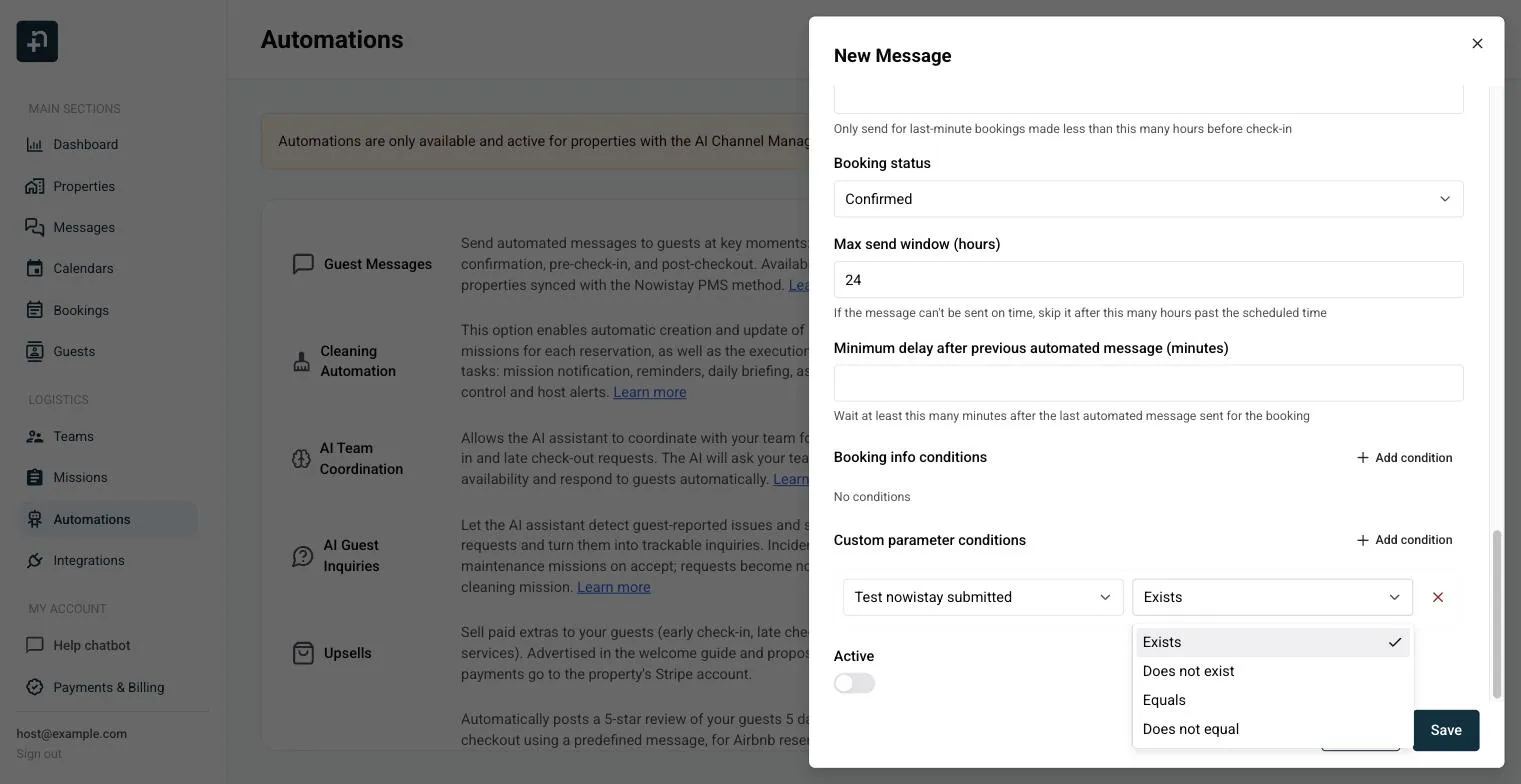
In the message editor, open Advanced options, go to Custom parameter conditions and click Add condition. Choose the parameter by its name, Contract signed, then the operator.
- Trigger event: Check-in, Timing (hours): 72, Before the event
- Condition: Contract signed + Does not exist
- Message body: “Hi
{{guest_first_name}}, we still need your signed rental contract before your arrival on{{arrival_date}}:{{form.contract}}. Your access instructions will follow as soon as it is signed.”
Guests who have already signed never receive this reminder.
Step 5: Send the access instructions only once signed
- Trigger event: Check-in, Timing (hours): 24, Before the event
- Condition: Contract signed + Exists
- Max send window (hours): 24
- Message body: “Hi
{{guest_first_name}}, thank you for signing the contract! Here is how to get in: the address is{{property_address}}and the key box is to the right of the front door.”
If the guest signs after the scheduled time, Nowistay sends the message as soon as the contract is signed, as long as the Max send window (hours) has not passed. You can also alert a team member when the contract is still unsigned a few hours before arrival, as described in the Tally guide.
Where to find the signed contracts
- In Tally, open the form’s Submissions tab: each response holds the guest’s name, acceptance and signature, saved as an image. You can also download each signed response as a PDF from that table.
- In Nowistay, open the booking: in Custom parameters, Contract signed is set to “true”.
Nowistay only records that the contract was signed. The contract and the signature stay in your Tally account.
Good to know
- Several guests must sign? Each one can sign with the same link: the booking stays marked as signed.
- Direct bookings: on your booking website, guests can also accept your terms before paying. Add your Terms & conditions URL in the direct booking settings.
- Test before going live: preview the first message on a booking, open the link, sign with test answers, then check the booking, as in Step 8 of the Tally guide.
Guides for hosts: read the blog.
Ready to Put Your Rental on Autopilot?