How to connect Tally forms to your bookings and automatic messages
The Tally integration links every Tally form your guests fill in to the right booking in Nowistay. You send each guest a personal link to your form. When they submit it, Nowistay marks the booking as submitted and can save some of their answers on it. Your automatic messages then react on their own: a reminder goes out only while the form is still missing, and the access instructions only once it has been sent.
Typical uses are a police registration form, an online check-in form, house rules to accept or an arrival questionnaire. This guide walks through the full setup with a real example.
What does the Tally integration do?
A personal form link for each booking. A message variable such as {{form.police}} becomes a link to your Tally form that carries a reference to the booking. Every guest gets their own link.
The submission is recorded on the booking. When the guest submits the form, Nowistay sets a booking parameter such as Police form submitted to "true" on that booking, usually within a few seconds.
Answers you choose are saved on the booking (optional). For example the estimated arrival time, which you can then reuse in your messages.
Your automatic messages react. Message conditions check whether the form was submitted, so the right message goes to the right guest without any manual follow-up.
The answers themselves, including uploaded ID photos, stay in your Tally account. Nowistay only stores the fact that the form was submitted and the answers you decide to save on the booking (80 characters maximum each).
Before you start
The AI Channel Manager subscription. Integrations are only available for properties with the AI Channel Manager subscription and configured with Nowistay PMS.
A Tally account and a form. The free Tally plan is enough: the API key Nowistay needs is free on every Tally plan.
Automatic messages set up. The form link is sent through your automatic guest messages. If you have not created any yet, start with how to set up automated guest messages.
One free booking custom parameter per form. Each connected form creates one booking custom parameter, and an account can have up to 20.
A real example: a police registration form before arrival
Sofia rents out three apartments in a city where every guest must be registered with the police before check-in. She needs each guest's identity details, and she does not want to send the door code to a guest who has not filled in the form. Here is what she sets up with Nowistay:
At booking: a message thanks the guest and asks them to fill in the registration form, with their personal link.
3 days before arrival: a reminder, sent only if the form is still missing.
The day before arrival: the access instructions and door code, sent only once the form has been submitted.
6 hours before arrival: an alert to her check-in team member if the form is still missing, so they can call the guest.
Bonus: the guest's estimated arrival time is saved on the booking and passed to her team.
The steps below follow Sofia's setup. Adapt the names, questions and timings to your own case.
Step 1: Create your form in Tally
In Tally, create the form your guests will fill in. Sofia's "Guest registration" form asks for:
Full name, date of birth and nationality of each guest
ID document type and number
A photo of the ID document
Estimated arrival time
Publish the form. You do not need to add anything for Nowistay yourself: Nowistay offers to add the booking reference for you in Step 4.
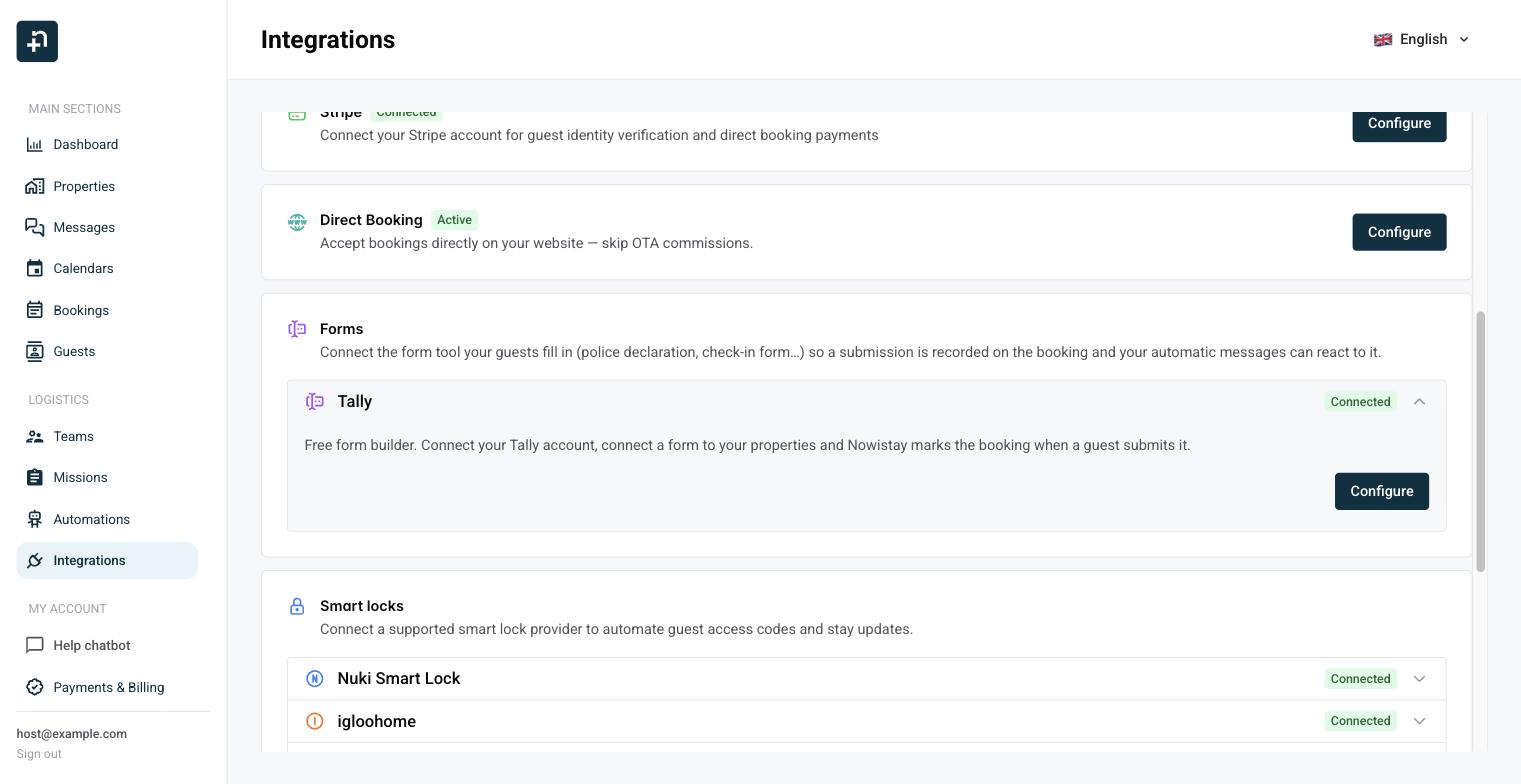
In the Forms section, open the Tally row and click Connect. The Tally forms panel opens.
Click Create an API key in Tally. It opens the API keys page of your Tally account. Create a key there and copy it.
Back in Nowistay, paste the key in the Tally API key field and click Connect.
The message "Tally account connected" confirms the connection, and the Tally row now shows Connected. Only the last four characters of the key are displayed afterwards.
The Integrations page: the Tally row sits in the Forms section.
Step 3: Connect a form and choose its identifier
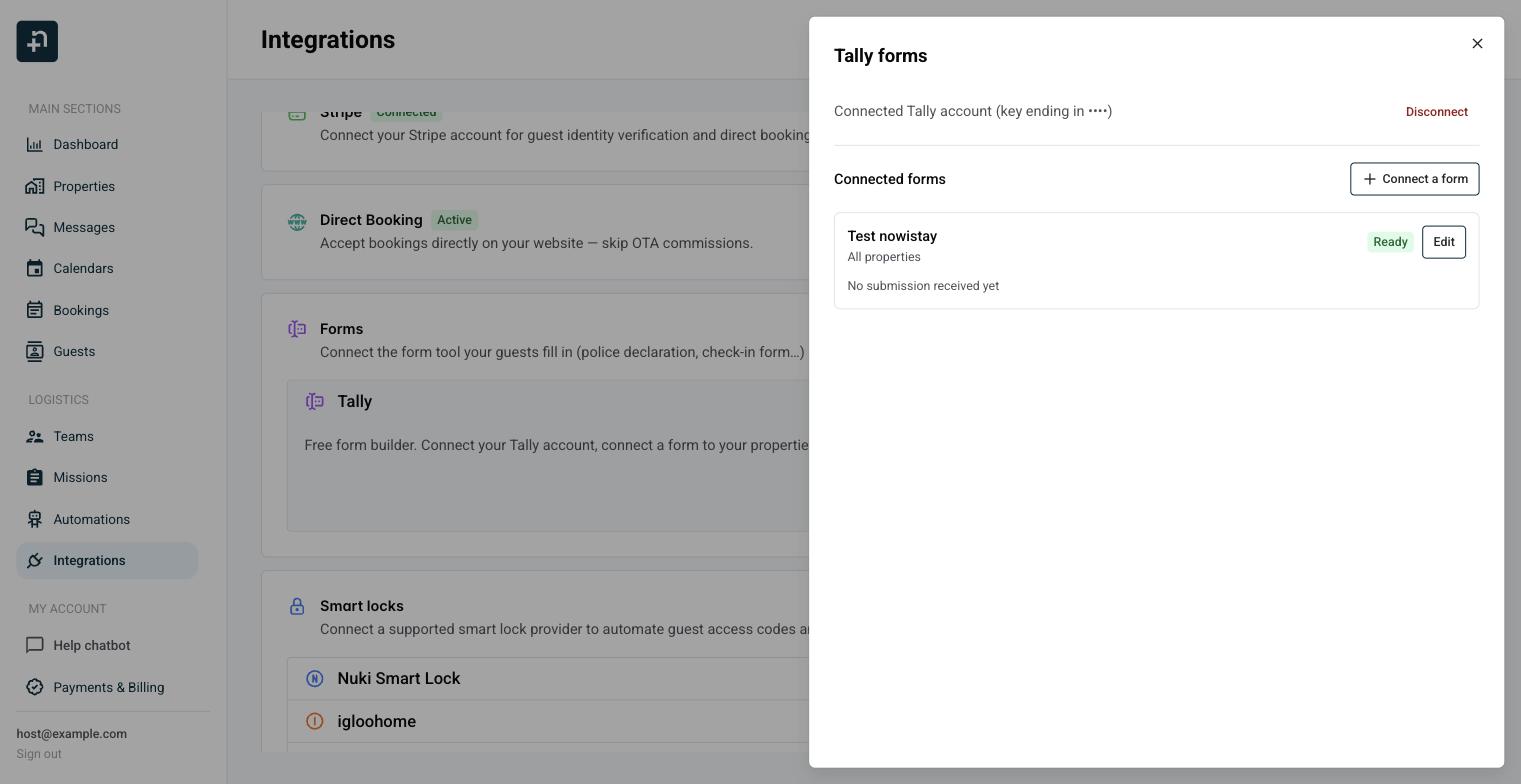
The Tally forms panel: your connected account, your connected forms and the Connect a form button.
In the Tally forms panel, click Connect a form.
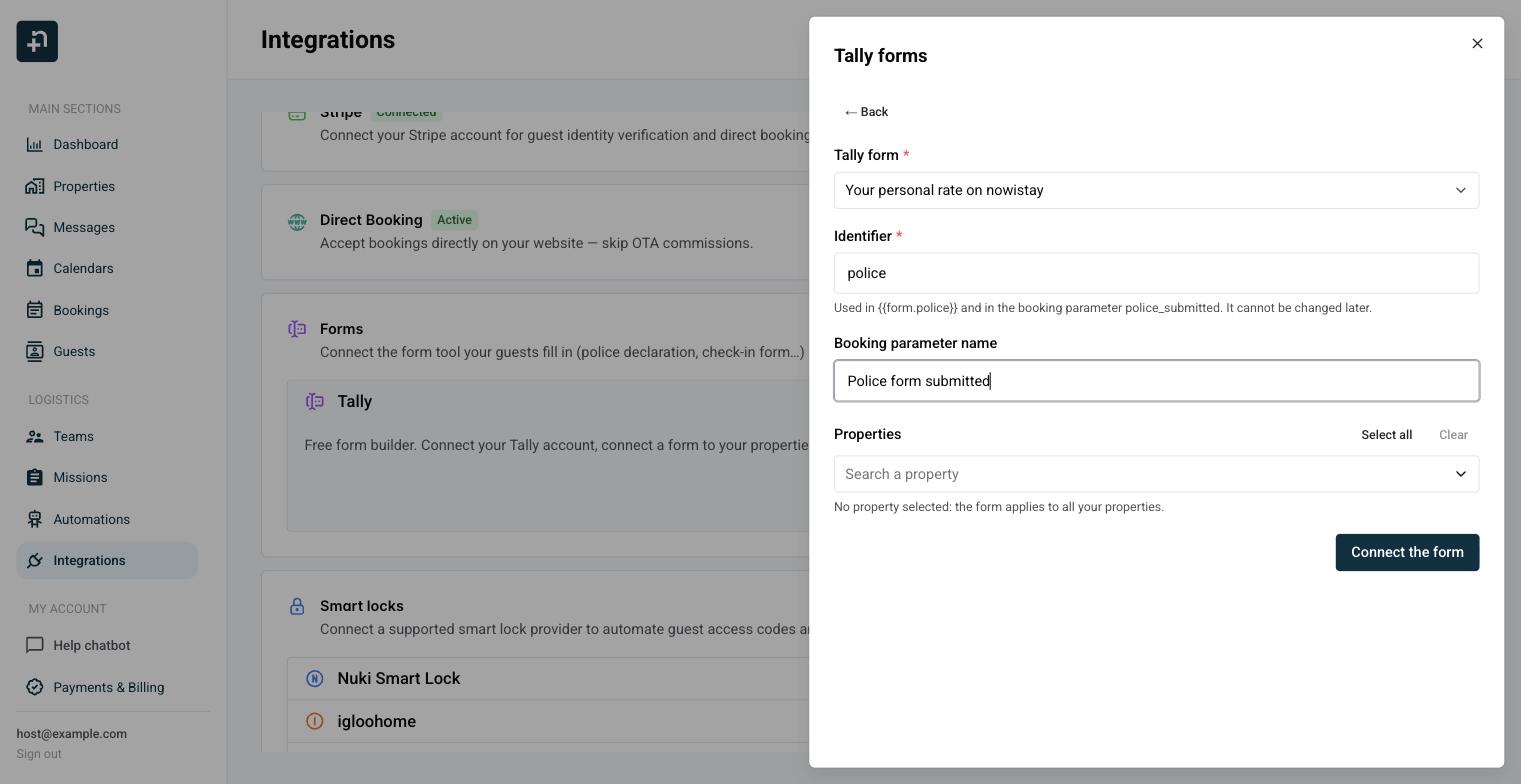
In Tally form, choose your form. Sofia picks "Guest registration".
Check the Identifier that Nowistay suggests, and change it if you want (see below). Sofia types police.
Check the Booking parameter name. Sofia renames it "Police form submitted".
Under Properties, select the properties that use this form, or leave the field empty to use it on all your properties.
Click Connect the form.
Connecting a form: the helper text under Identifier shows the variable and the booking parameter it creates.
What is the identifier?
The identifier is a short name you choose for the form. Nowistay uses it in two places:
The message variable {{form.police}}, which you insert in your messages to send the form link.
The booking parameter police_submitted, which Nowistay creates automatically and sets to "true" when the guest submits the form.
When you choose a form, Nowistay suggests an identifier based on its name. It can only contain lowercase letters, digits and underscores (30 characters maximum), and it cannot be changed later. Pick something short and clear, such as police, checkin or house_rules.
What is the booking parameter name?
It is the readable name of the police_submitted parameter. You see it on each booking and, above all, in the list of message conditions. Nowistay pre-fills it with "<form name> submitted". Choose a name you will recognize, like "Police form submitted".
Which properties?
With no property selected, the form applies to all your properties. If you select some properties, the {{form.police}} variable only produces a link for bookings of those properties, and stays empty for the others. This lets you use different forms in different cities while keeping one set of message templates.
Step 4: Add the hidden booking reference to the form
Right after you connect the form, Nowistay asks "Add the hidden field to your Tally form?". Click Add the field.
Nowistay then adds a hidden field named nowistay_booking to your Tally form. Guests do not see it: it only carries the booking reference from their personal link, so that Nowistay knows which booking the submission belongs to. Nothing else in your form is changed. The form now shows the Ready badge in the list of connected forms.
If you skipped this window, the form shows Hidden field missing. Click Edit on the form, then either:
click Add it for me, or
add it yourself: in Tally, open the form, type /hidden, name the field exactly nowistay_booking, publish the form, then click Check again in Nowistay.
Step 5 (optional): Save some answers on the booking
Sofia wants her team to know the guest's estimated arrival time. She saves that answer in a booking parameter.
First, create the parameter that will store the answer:
Click Properties in the sidebar.
On any property, click the … button and choose Advanced settings.
In Booking custom parameters, click the + button (Add parameter).
Enter an API identifier (arrival_time) and a Display label (Arrival time), then click Create.
Booking custom parameters are shared by all your properties, even though you create them from one property.
Then link the question to the parameter:
Go back to Integrations, open the Tally row and click Configure.
Click Edit on the form.
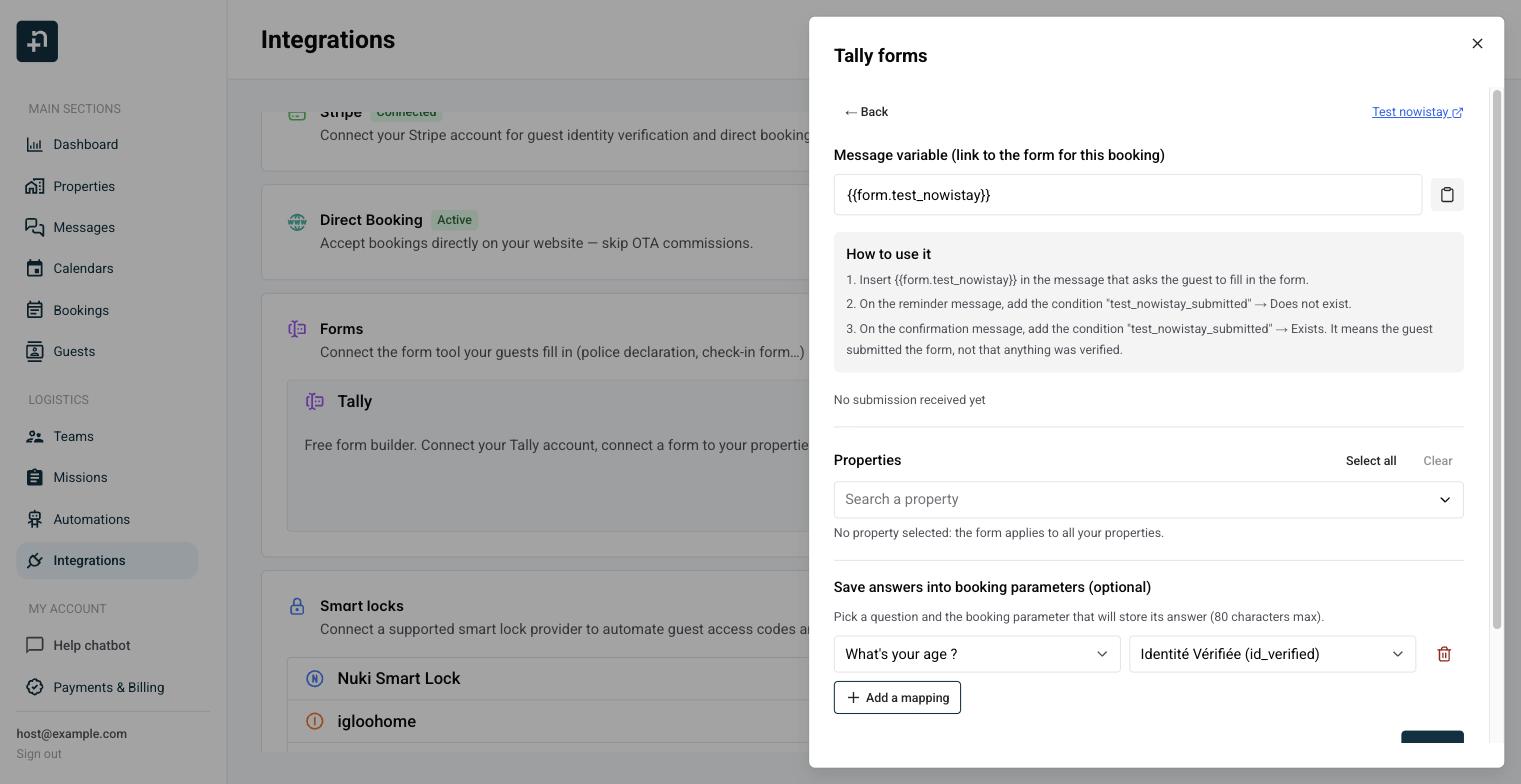
In Save answers into booking parameters (optional), click Add a mapping.
Choose the Question ("Estimated arrival time") and the Booking parameter (Arrival time).
Click Save.
Editing a connected form: the message variable to copy, the How to use it box and the answer mappings.
Good to know about saved answers:
Each answer is saved as text, up to 80 characters. For choice questions, the text of the chosen option is saved, and several choices are separated by commas.
Text, number, date, time and choice questions can be saved. File uploads, signatures and payments cannot: they stay in Tally.
If the guest submits the form again, the new answer replaces the previous one.
A saved answer can be used in messages with its variable, here {{custom.arrival_time}}, and in message conditions.
Step 6: Send the form link in an automatic message
Click Automations in the sidebar.
On the Guest Messages row, click Manage messages, then Add message.
Set the Trigger event and Timing (hours).
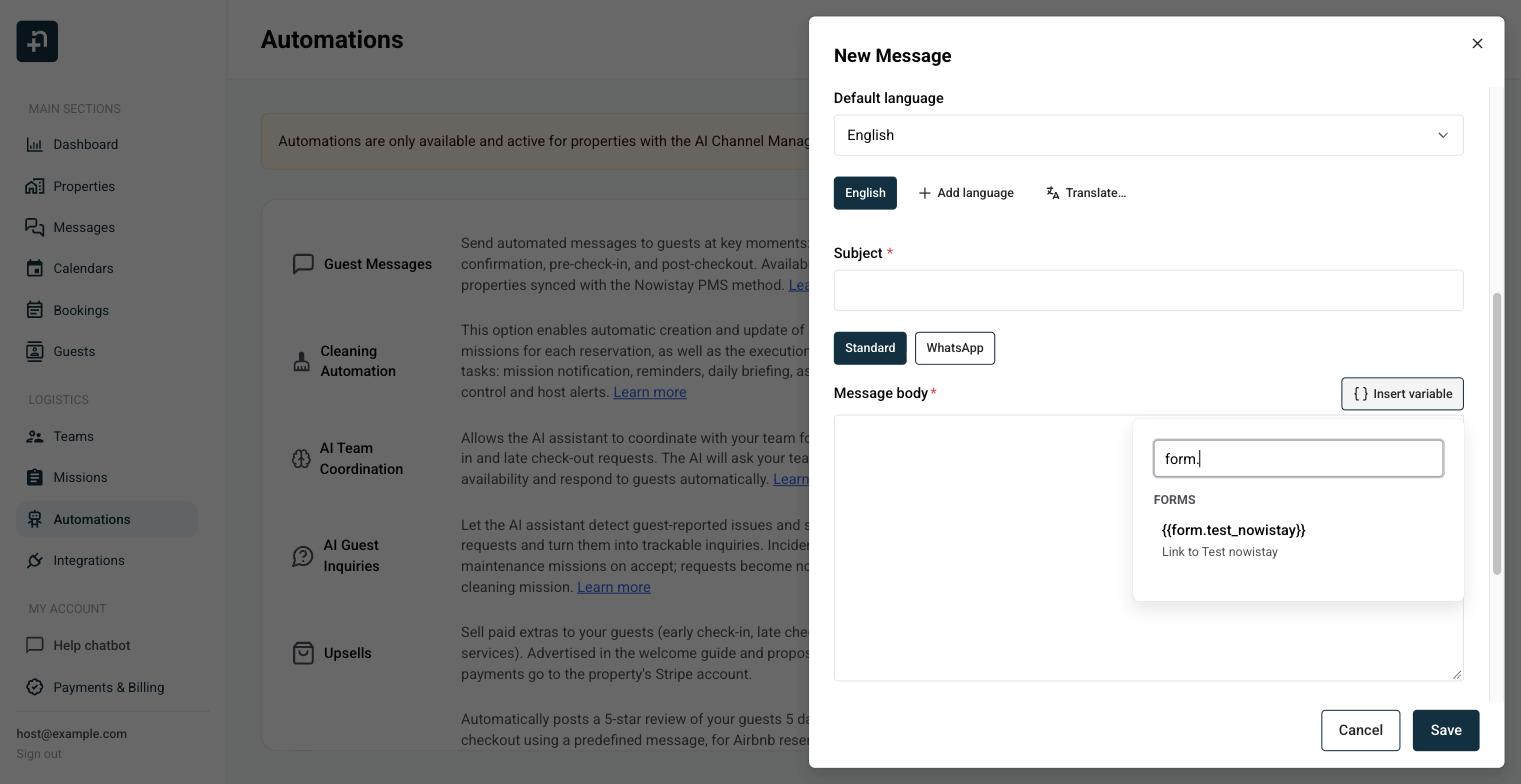
In Message body, click Insert variable. In the Forms group, pick {{form.police}}, described as "Link to Guest registration". Typing form. in the search box shows only your form links.
Click Save.
Sofia's first message:
Trigger event: Booking Confirmed
Timing (hours): 0, After the event
Message body: "Hi {{guest_first_name}}, thank you for booking {{property_name}}! Local rules require us to register every guest before arrival. Please fill in this short form, it takes 2 minutes: {{form.police}}. We will send your access instructions as soon as it is done."
Each guest receives a link that is personal to their booking. Always send the form through this variable, never the public Tally link: a form opened from the public link cannot be linked to a booking.
In the message editor, type form. in the variable search to find your form links.
Step 7: React to the submission with message conditions
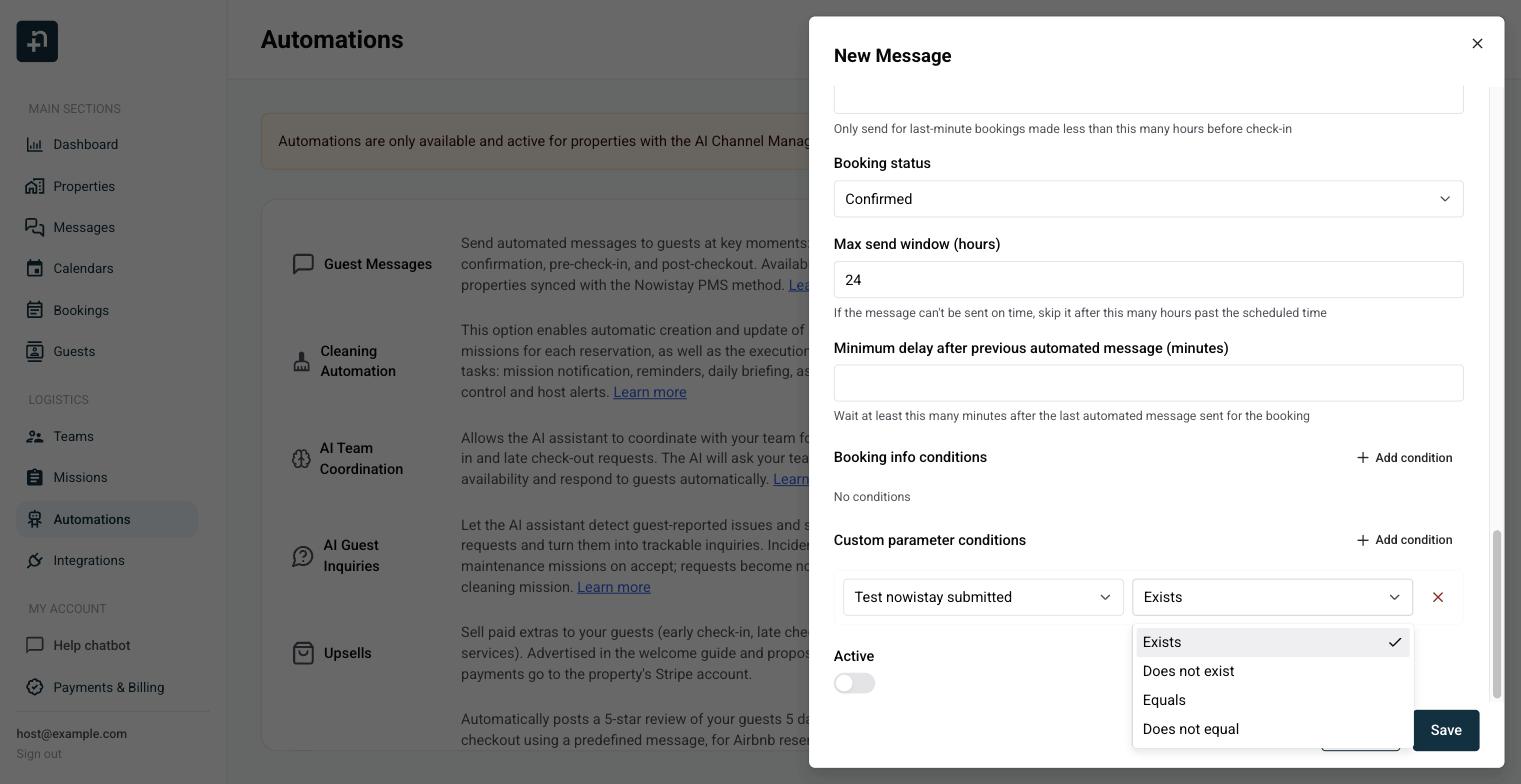
Conditions decide whether a message goes out. In the message editor, open Advanced options, go to Custom parameter conditions and click Add condition. Choose the parameter by its name (Police form submitted), then the operator:
Exists: the guest has submitted the form.
Does not exist: the guest has not submitted it yet.
Advanced options: a custom parameter condition on the form's submitted parameter.
The How to use it box of the Tally panel refers to the parameter by its identifier (police_submitted). In the condition list, look for its name instead.
Reminder while the form is missing
Trigger event: Check-in, Timing (hours): 72, Before the event
Condition: Police form submitted + Does not exist
Message body: "Hi {{guest_first_name}}, we still need your registration form before your arrival on {{arrival_date}}: {{form.police}}. Your access instructions will follow as soon as it is completed."
Guests who already filled in the form never receive this reminder.
Access instructions only after submission
Trigger event: Check-in, Timing (hours): 24, Before the event
Condition: Police form submitted + Exists. With a smart lock, also add the booking info condition Smart lock code + Exists.
Max send window (hours): 24
Message body: "Hi {{guest_first_name}}, thank you for your registration! Here is how to get in: the address is {{property_address}} and your door code is {{smartlock_code}}."
What if the guest fills in the form after the scheduled time? Nowistay does not give up: it keeps checking the condition and sends the message as soon as the form is submitted, as long as the Max send window (hours) has not passed. With a 24-hour window on a message scheduled 24 hours before arrival, the access instructions can still go out up to the check-in time.
Alert your team if the form is still missing
Trigger event: Check-in, Timing (hours): 6, Before the event
Send via:Team member, then choose the person in charge of check-ins
Condition: Police form submitted + Does not exist
Message body: "Hi {{team_member_first_name}}, {{guest_full_name}} arrives today at {{property_name}} and has not filled in the registration form yet. Please contact them before handing over the keys."
Share the arrival time with your team
Trigger event: Check-in, Timing (hours): 3, Before the event
Send via:Team member
Condition: Arrival time + Exists
Message body: "{{guest_full_name}} ({{guest_count}} guests) expects to arrive at {{custom.arrival_time}} at {{property_name}}."
Important: "Exists" means the guest submitted the form, not that the information is correct. Check the answers in Tally when it matters. To check a guest's identity document for real, use guest identity verification.
Step 8: Test before going live
In the templates panel, click the eye icon (Preview) on the message that contains the link.
In Select a booking, choose a booking of a property covered by the form, then click Preview. The message shows the personal form link.
Copy the link, open it in your browser and submit the form with test answers. Do not click Send now: it sends a real message to the guest.
In Integrations, open the Tally panel: the form shows Last submission with the date.
Open the booking: in Custom parameters, Police form submitted is set to "true", and Arrival time shows your test answer.
Clean up: click Edit in the Custom parameters section and use Remove from this booking on each test value.
What happens when a guest submits the form?
The booking is updated, usually within a few seconds.
Messages waiting for the condition are sent at their next check. Messages already sent are not sent again.
If the form is submitted again with the same link (for example by a second guest of the same booking), the same booking is updated: the submitted parameter stays "true" and each saved answer keeps the latest value.
Submissions are accepted until 30 days after departure. Submissions for cancelled bookings are ignored.
Why was a submission ignored?
In the Tally panel, each form shows its last submission. If it was ignored, the reason is displayed:
"no booking reference (the form was opened directly, not from the link in your message)": the guest used the public Tally link, or the hidden field is missing. Check that the form shows Ready and that your messages use the {{form.…}} variable.
"invalid booking reference": the link was modified or cut. Ask the guest to open the form again from the link in your message.
"booking not covered by this form (other property, cancelled, or stay ended more than 30 days ago)": add the property to the form, or check the booking's status and dates.
If connecting your account shows "Tally rejected this API key", create a new key in Tally and paste it again.
Detach a form or disconnect Tally
To detach a form: in the Tally panel, click Edit on the form, then Detach the form, and confirm with Detach.
The {{form.…}} variable becomes empty in your messages. Remove it from your templates.
Nowistay removes the nowistay_booking hidden field from your Tally form. Your questions and existing answers stay in Tally.
The booking parameter and its values are kept, unless you tick Also delete the booking parameter and its values when detaching. If a message condition still uses the parameter, remove the condition first.
To disconnect Tally: in the Tally panel, click Disconnect next to your connected account and confirm. All connected forms are detached and the form variables become empty. Booking parameters and their values are kept.
Good to know
One Tally account can be connected per Nowistay account, and you can connect several of its forms, each with its own identifier (for example police and house_rules).
Each connected form uses one of your 20 booking custom parameters, as does each parameter you create to save answers.
The identifier cannot be changed. To use another one, detach the form and connect it again.
The form link works on every channel your automatic messages use: Airbnb, Booking.com, VRBO, Expedia, WhatsApp and email.
You can see and edit a booking's parameters from the booking itself, in the Custom parameters section.