This guide walks you through every step of moving from Lodgify to Nowistay as your channel manager and property management system. Plan about 20 minutes per property, plus the time to export your data from Lodgify.
Airbnb accepts only one channel manager per account, and Booking.com, Vrbo and Expedia only one per property, so each channel has to move from Lodgify to Nowistay. The fastest and most reliable way does not depend on Lodgify at all: you remove Lodgify’s access from your Airbnb account and you switch the connectivity provider in your Booking.com extranet. No support ticket, no waiting. The Lodgify-specific instructions below cover everything else: what to export, where your message templates and booking website live, and how to cancel your subscription.
Lodgify tip: keep your Lodgify website online and your rentals assigned until all your channels have moved. Lodgify notes that taking the website offline or unassigning a rental suspends its channel connections. Already using Nowistay with the Lodgify connection? Step 1 has a dedicated option for you.
Moving from a different tool? Read the general guide: How to migrate from your PMS (channel manager) to Nowistay.
Remove the old Airbnb connection and connect Nowistay in one sitting, ideally at a quiet time of the day: in between, nobody updates your Airbnb calendar.
Lodgify does not transfer your data to another tool, and some of it disappears when you disconnect a channel or when the subscription ends. Save it first:
Also have these ready:
Details: What changes when you connect Nowistay as your channel manager.
This cuts the connection from Airbnb’s side. It works whatever the state of your Lodgify account, and it disconnects all your listings in one go.
Airbnb disconnects every listing that was linked to Lodgify at once. Older Airbnb pages call this section Privacy & sharing and Services: it is the same place.
Prefer to start from Lodgify? In Lodgify, go to Channel Manager > Airbnb > Manage accounts, click Disconnect, pick a reason and confirm. To stop one listing only, click View details next to the rental, then Unsync. Lodgify then removes the Airbnb reservations of those listings from its calendar, which is why you export first.
After a channel manager is disconnected, Airbnb may put some settings back to their default values (minimum stay, maximum stay, closed to arrival or departure). You will check them in Step 6.
Option A: your property is already on Nowistay through the Lodgify connection. Keep it: only the synchronization method changes, and your welcome guide and AI co-host settings stay as they are.
Download your bookings first. Switching the method deletes the bookings that came from Lodgify, past and upcoming. Upcoming Airbnb and Booking.com reservations come back when you connect those channels, but direct bookings made in Lodgify do not. Go to Bookings, click the … button, then Download CSV: you will import them again in Step 5. Bookings created in Nowistay itself (manual bookings, direct booking widget) are kept.
If Nowistay asks Which calendar should we use?, choose Use the Airbnb calendar: your Airbnb calendar holds the prices Lodgify published.
Option B: you are new to Nowistay.
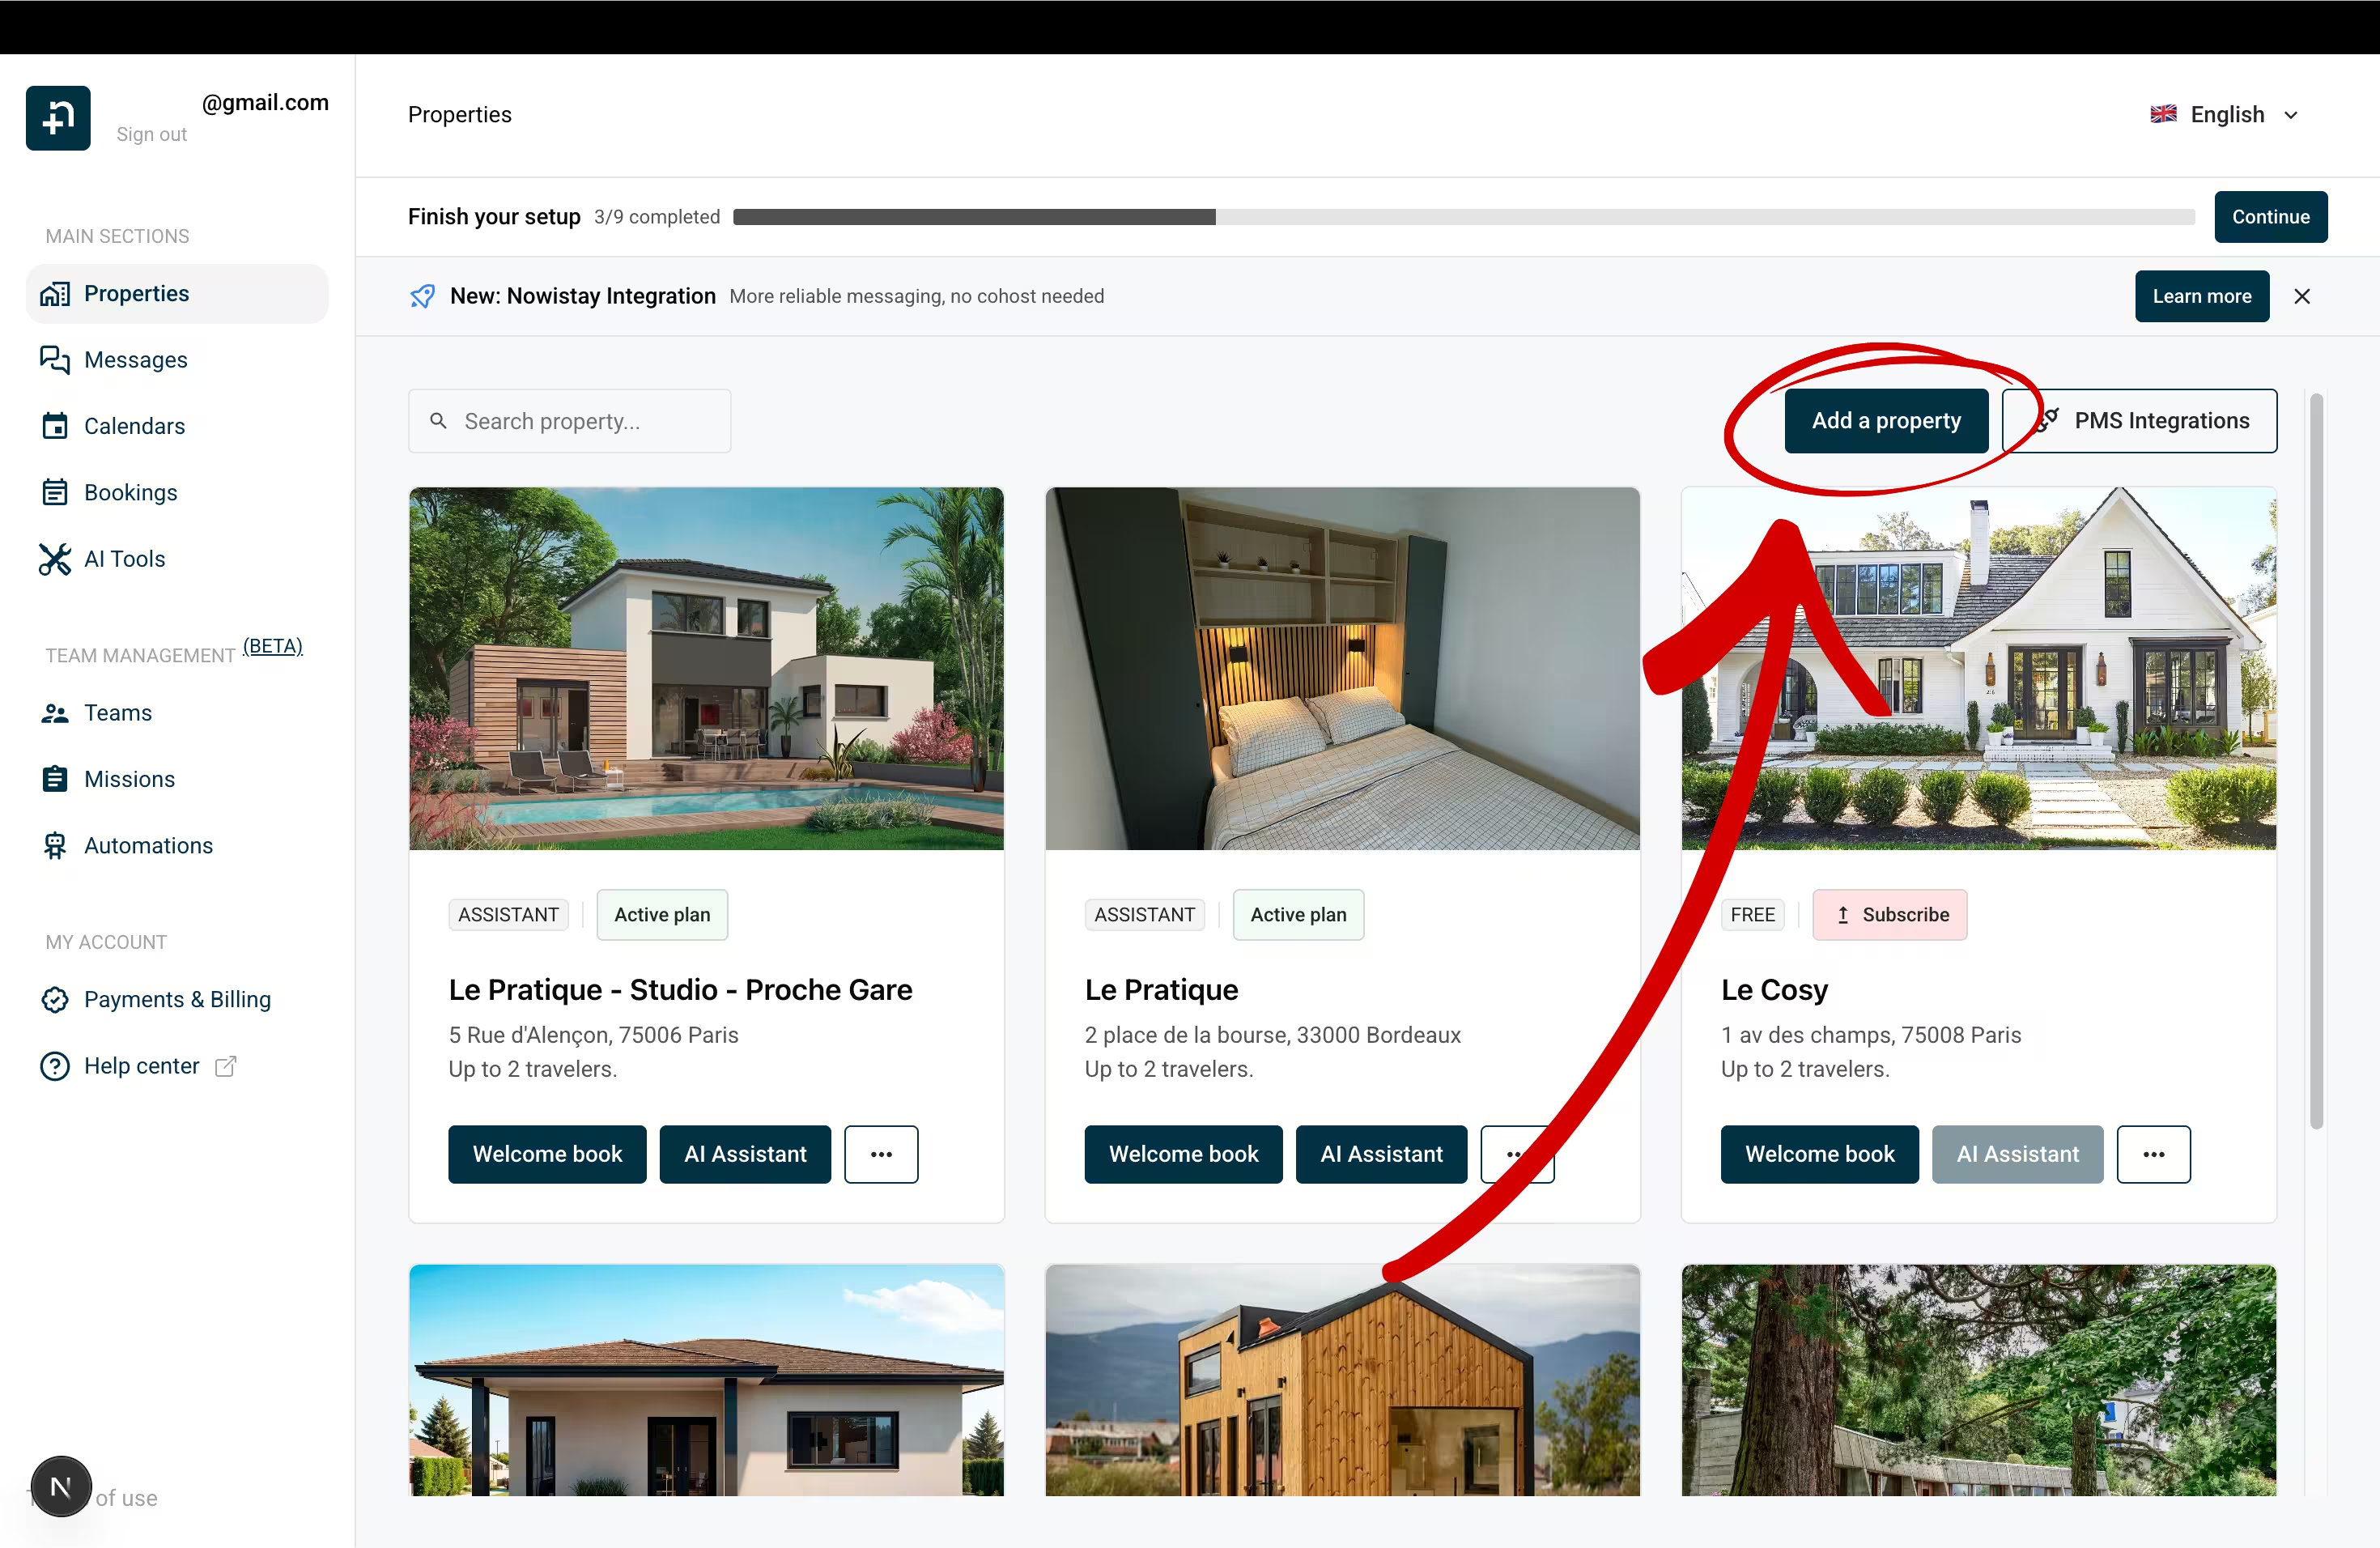
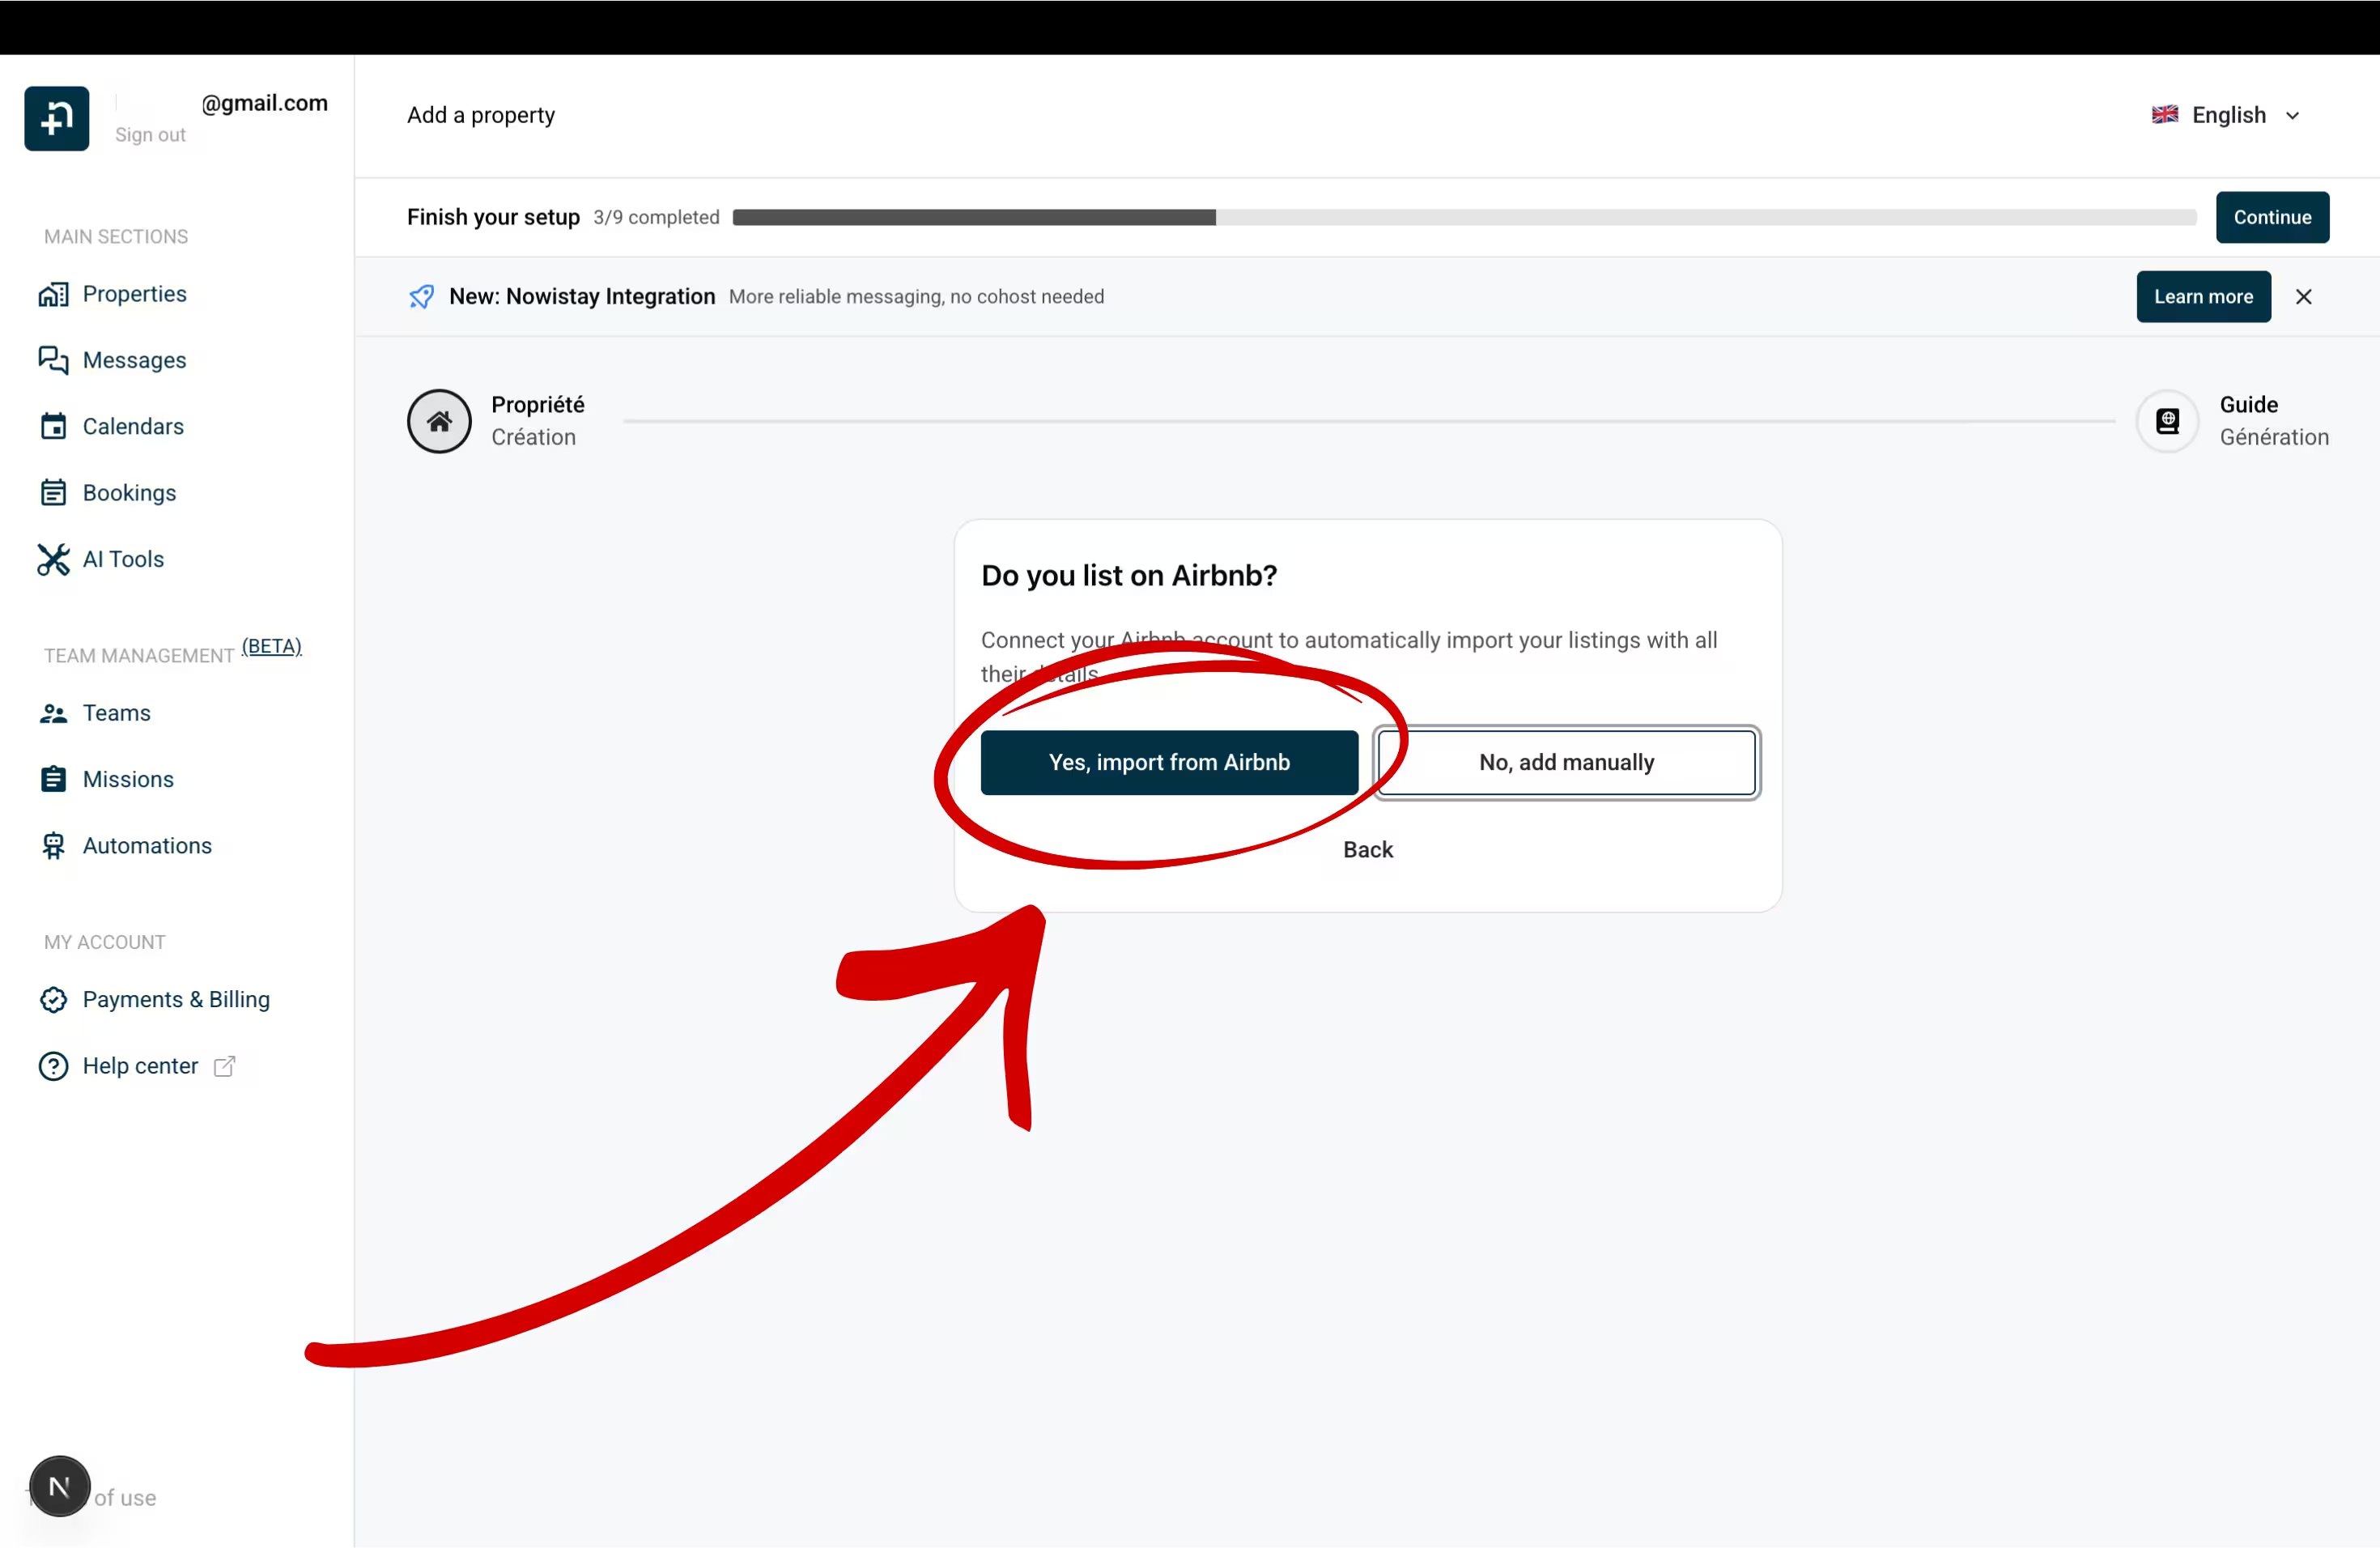
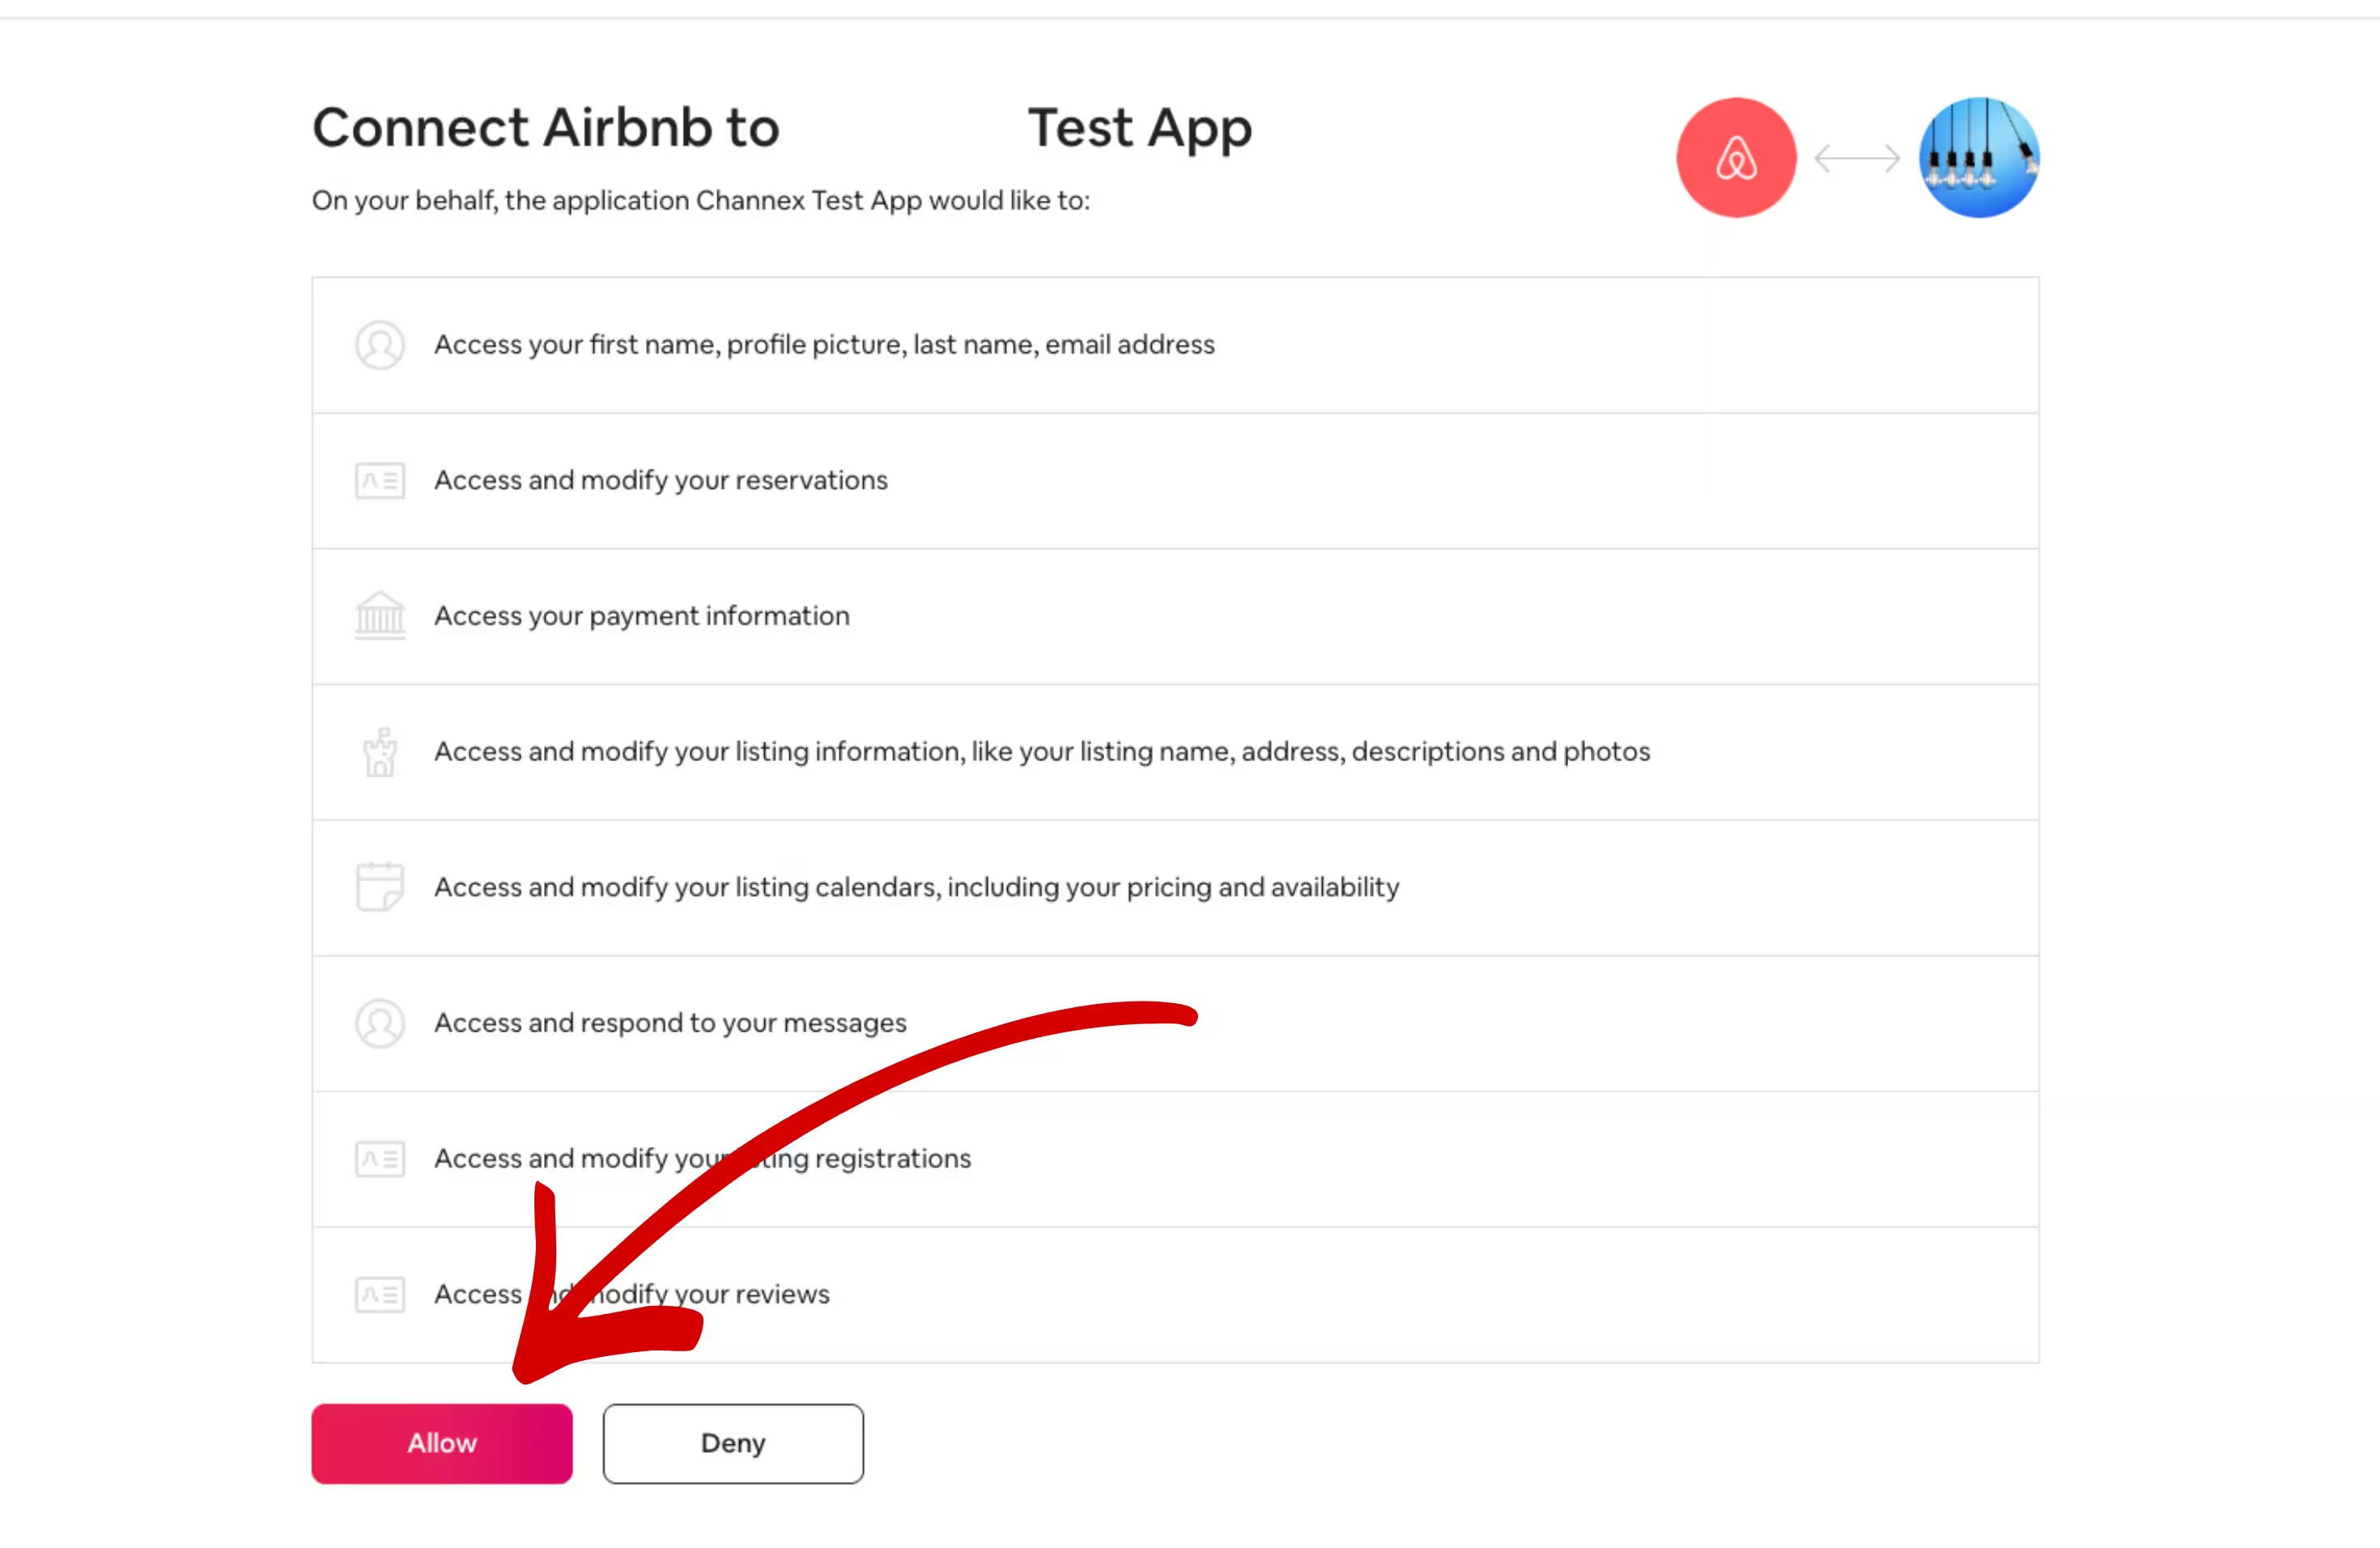
Each property is created with its Airbnb data: name, photos, description, prices and availability. Detailed walkthrough: Connect Airbnb to Nowistay.
Booking.com lets you go straight from Lodgify to the new provider. Your property stays connected to Lodgify until the switch is complete, so it never goes unmanaged.

Repeat this for each Booking.com property, even if you already did it for another one.
If Booking.com is the first channel of this property, Nowistay first asks for a Default night rate. Detailed walkthrough: Connect Booking.com to Nowistay.
Then remove the account in Lodgify: Channel Manager > Booking.com > Manage accounts > Disconnect, choose a reason and confirm. Your Booking.com account belongs to you and keeps working, even if Lodgify created it.
Links in messages: Booking.com only lets guests open links that you have allowed in the extranet. If your welcome guide link is not clickable, see Welcome guide links not clickable on Booking.com.
Lodgify connects Vrbo through Vrbo’s official connection, which you cannot switch off yourself. Contact Vrbo support (Contact Us > I’m a Property Manager > Software Integration) and ask them to disconnect your listings from Lodgify because you are switching to new software. If the sync with Lodgify was complete, Lodgify asks you to contact its Connectivity team too. Bookings already made then show as Vrbo managed in Lodgify: changes and payments for them are handled in Vrbo. Lodgify disables the listing when the subscription expires, so arrange this well before cancelling.
Then connect Vrbo in Nowistay: Synchronization > Add a booking platform (OTA) > Vrbo, enter your Vrbo username or email and Vrbo password, click Next, choose the phone number for the SMS code, click Request verification code, enter the code and click Verify code, then select your listing and click Connect. Vrbo does not share bookings made before the connection: add them with the CSV import (Step 5). Guest messaging is not available through Vrbo, so reach Vrbo guests by email or WhatsApp. Detailed walkthrough: How to connect your Vrbo listing.
If Lodgify connected Expedia through Partner Central, switch the provider there as below (Lodgify’s own steps, Disconnect providers, would leave the property without any provider), then ask Lodgify to remove the mapping. If Lodgify published your rentals to Expedia through Vrbo, you have no Partner Central access: those Expedia listings follow your Vrbo listing, and connecting Expedia in Nowistay requires a property in Expedia Partner Central with its own Hotel ID.
To switch Expedia to Nowistay: in Expedia Partner Central, select the property, go to Rooms and Rates > Connectivity Settings, click Change Provider, search for Channex, click Next, then confirm with Change provider. Make sure Channex manages both rates and availability and booking retrieval. If Connectivity Settings is missing, open a ticket with Expedia of type Room, Rates and Availability. Then, in Nowistay: Synchronization > Add a booking platform (OTA) > Expedia, enter your Expedia Hotel ID, choose the Minimum stay rule (Arrival or Through), select the room type and click Connect.
Upcoming Airbnb and Booking.com reservations arrive in Nowistay by themselves when you connect those channels. What does not come back on its own: direct bookings and bookings taken by phone or email in Lodgify, Vrbo bookings made before the connection, and owner stays. Import them from a CSV file so your calendar is complete and no one can book those nights again.
Good to know: imported bookings are added as direct bookings and block the nights on all your channels. Duplicates (same reservation number, or same dates and same guest) and upcoming stays that overlap a booking you already have are skipped, so re-importing the same file is safe. Guests do not receive a booking confirmation, but your check-in and check-out messages are scheduled for their upcoming stays. A wrong import can be undone from Import history > Delete & revert. Full guide: Import bookings from a CSV file.
Right after connecting your channels, check that prices and availability are right. Some values may have been reset when Lodgify was disconnected.
Markup on Airbnb prices: when you connect Airbnb, Nowistay copies your current Airbnb prices into its calendar. If your Airbnb prices included a markup, those marked-up prices became your base prices and would also be sent to your other channels: lower your base prices in the calendar, then add the markup back for Airbnb only with the Rate Adjustment setting (below).
Guide: How to manage availability and prices from the calendar.
On the Properties page, click … then Property infos, and check Default night rate, Earliest arrival time (check-in), Latest departure time (check-out), the default minimum and maximum number of nights and the Cut-off time. Click Save.
In Synchronization, click the gear icon (Channel settings) on your Airbnb connection:
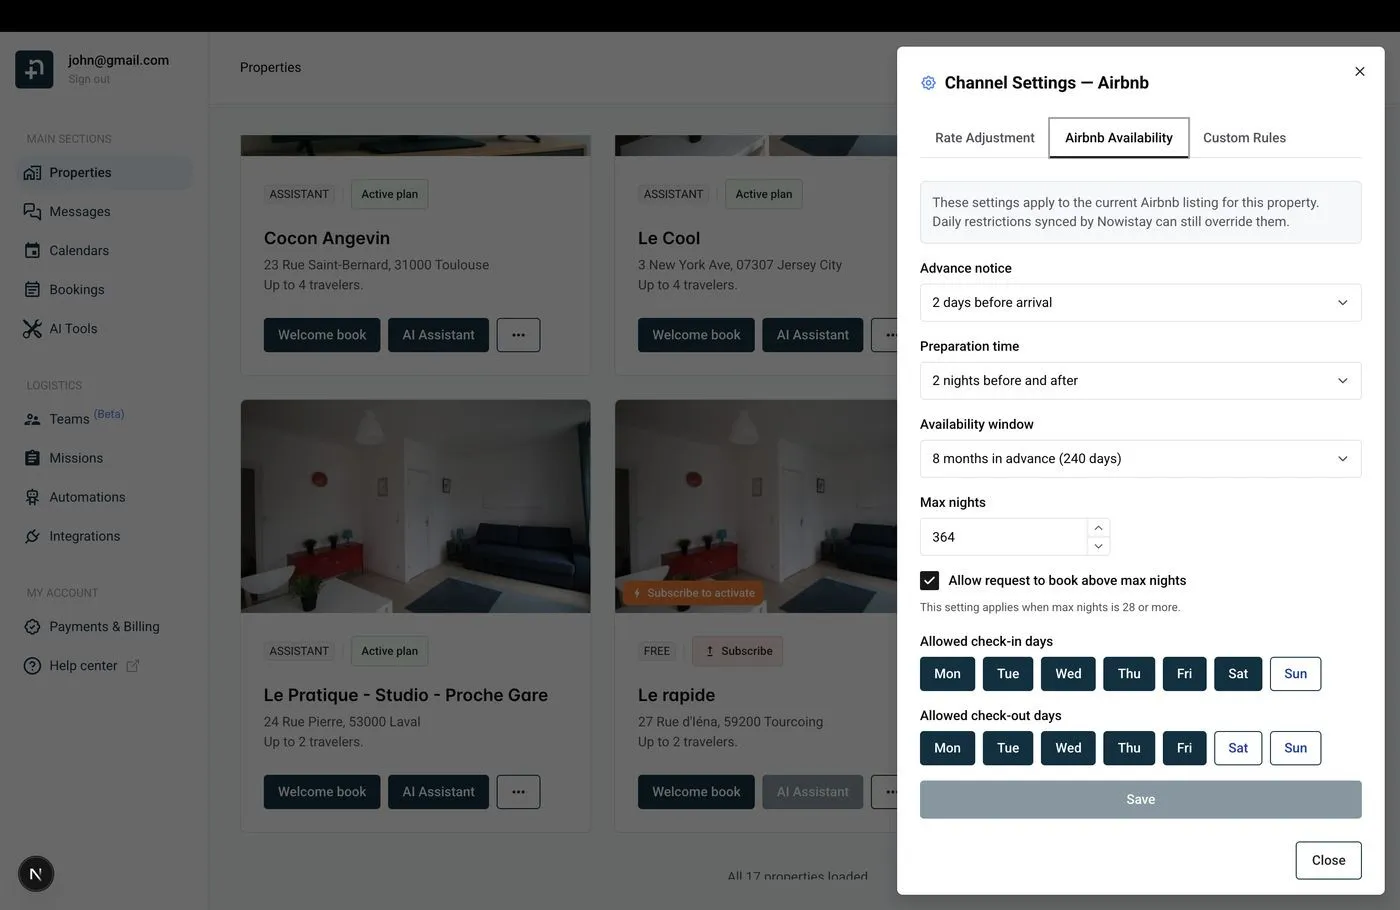
Guide: Airbnb availability settings.
Nowistay then helps you create your welcome guide, the digital guest handbook the AI co-host uses to answer questions. Let the AI generate it from your Airbnb listing and your PDF documents, copy a guide from another property, or start from scratch. Paste in what you used to send from Lodgify: arrival instructions, Wi-Fi, house rules, parking, local tips. Your AI co-host then answers guests on Airbnb, Booking.com, Expedia, WhatsApp and email, 24/7, from the first inquiry. Guide: Create your digital welcome guide with AI.
In Lodgify, your messages are under Inbox > Automate > Scheduled messages (older accounts: Settings > Default notifications and Custom notifications). Also check your automatic responses and quick replies in Settings, and the per-rental Messaging Placeholders (check-in and check-out instructions, door, Wi-Fi, house rules, local guide). None of these can be exported: copy them into a document.
Nowistay sends each message in the guest’s language: add languages to a template and use Translate from default to translate it with AI.
Lodgify and Nowistay both use double braces, only the names change. Lodgify has no placeholder for check-in and check-out times: in Nowistay, use {{check_in_time}} and {{check_out_time}}. The content of {{CheckinInstructions}}, {{DoorInstructions}}, {{WifiInformation}}, {{RentalRules}} or {{LocalGuide}} goes into your welcome guide.
{{GuestFirstName}} → {{guest_first_name}}{{GuestFullName}} or {{GuestName}} → {{guest_full_name}}{{number_of_children}}): {{NumberOfPeople}} → {{guest_count}}{{Arrival}} → {{arrival_date}}{{Departure}} → {{departure_date}}{{NumberOfNights}} → {{number_of_nights}}{{HouseName}} → {{property_name}}{{HouseAddress}} → {{property_address}}{{HouseCity}} → {{property_city}}{{BookingId}} → {{reservation_number}}{{TotalAmount}} → {{booking_amount}}{{CurrencyCode}} → {{currency}}{{KeyCode}} → {{smartlock_code}}Nowistay also offers {{arrival_day_name}}, {{days_to_checkin}}, {{host_first_name}}, {{whatsapp_link}}, {{identity_check_link}} (guest identity verification) and {{deposit_payment_link}} (security deposit). Wi-Fi codes, parking details and other fixed property information belong in your welcome guide, or in property variables you can insert from the variable picker.
Example: to send a message at 10:00 two days before arrival with a 16:00 check-in, choose Check-in, Before the event, 54 hours.
Then switch off your Lodgify scheduled messages so guests don’t receive them twice.
Guide: How to set up automated guest messages.
With PriceLabs, your prices went through Lodgify’s External rates setting. In PriceLabs, turn off Sync Prices for the Lodgify listings, then add them again through Nowistay as below. If you used Lodgify’s built-in dynamic pricing, your prices now live in the Nowistay calendar: check them in Step 6.
To connect PriceLabs to Nowistay: go to Integrations, open the Pricelabs card, click Configure then Generate Key and copy the key. In PriceLabs, click Add Your Listings, select Channex, paste the key and click Connect. A property appears once it is on Nowistay PMS with at least one connected channel. Your PriceLabs strategies keep working, only the connection changes. Guide: How to connect PriceLabs for dynamic pricing.
In Nowistay, go to Integrations > Smart locks and click Connect on your brand: Nuki, igloohome, Tedee, TTLock, Homeit, and the Premium connection for Schlage, Yale, August and KeyNest. Nowistay creates a code for each booking, valid from check-in to check-out, and sends it with the {{smartlock_code}} variable.
Lodgify Smart Locks is a paid add-on: cancel it separately in Billing (three dots > Cancel), and replace {{KeyCode}} with {{smartlock_code}} in your messages.
Many Lodgify hosts run their direct booking website on Lodgify’s website builder. It stays online until your subscription expires, so plan the switch:
To take direct bookings with Nowistay: go to Integrations > Direct Booking > Configure, connect your Stripe account (Connect Stripe Account), click Create widget (Single property or Multiple properties), then copy the Embed code and paste it where the old widget was. In the widget settings, choose Full payment or Split payment, and add your taxes and discounts. The widget works on WordPress, Webflow, Wix, Squarespace or plain HTML. Guide: How to set up direct booking on your website.
Do this last, once Airbnb, Booking.com, Vrbo and Expedia all show as connected in Nowistay and your direct bookings are imported. Disconnecting channels does not stop Lodgify billing: you have to cancel.
With one rental, the cancellation is processed automatically and the status shows Canceled; with several, a Lodgify agent contacts you. Cancel at least one day before the end of your term (five days if you cancel by email). Cancelling an annual plan early is not refunded, and transaction fees continue while a payment gateway is active.
