How to migrate from Guesty to Nowistay

All help ressources
 > 
How to migrate from Guesty to Nowistay

This guide walks you through every step of moving from Guesty to Nowistay as your channel manager and property management system. Plan about 20 minutes per property, plus the time to export your data from Guesty.

Airbnb accepts only one channel manager per account, and Booking.com, Vrbo and Expedia only one per property, so each channel has to move from Guesty to Nowistay. The fastest and most reliable way does not depend on Guesty at all: you remove Guesty’s access from your Airbnb account and you switch the connectivity provider in your Booking.com extranet. No support ticket, no waiting. The Guesty-specific instructions below cover everything else: what to export, where your message templates and booking website live, and how to cancel your subscription.

This guide covers Guesty Pro and Guesty Lite; where menus differ, both are given. In Guesty Pro, channels are under Marketing and sales > Distribution (or the Growth mode > Distribution, depending on your account).

Moving from a different tool? Read the general guide: How to migrate from your PMS (channel manager) to Nowistay.

Why switch from Guesty to Nowistay?

  • A fully autonomous AI co-host: it answers your guests 24/7 on Airbnb, Booking.com, Expedia, WhatsApp and email, from the very first inquiry message, without waiting for your approval. It uses your welcome guide and property information to answer accurately.
  • A complete channel manager: one calendar for prices, availability and stay rules on Airbnb, Booking.com, Vrbo and Expedia, synchronized in real time, from 1 to 100+ properties.
  • Set up in minutes: your Airbnb listings are imported with their photos, description and prices, then you add your other channels with a few clicks.
  • Team and cleaning automation: a cleaning mission on every checkout, assignment to your team, checklists with photo reports.
  • Everything else in one place: digital welcome guide, smart lock codes sent automatically, direct booking widget with Stripe, PriceLabs dynamic pricing, ChatGPT and Claude connectors.

The migration at a glance

  1. Export your bookings, guests and message templates from Guesty while your subscription is still active.
  2. Remove Guesty’s access on Airbnb, then connect Airbnb to Nowistay right away.
  3. Switch the Booking.com connectivity provider to Nowistay’s partner, Channex.io, and connect Booking.com in Nowistay.
  4. Move Vrbo and Expedia if you use them.
  5. Import your direct bookings, check your calendar and recreate your automated messages.
  6. Cancel Guesty last, once every channel runs on Nowistay.

Remove the old Airbnb connection and connect Nowistay in one sitting, ideally at a quiet time of the day: in between, nobody updates your Airbnb calendar.

Before you start: export your data from Guesty

Guesty does not transfer your data to another tool, and some of it disappears when you disconnect a channel or when the subscription ends. Save it first:

  • Reservations: in Guesty Pro, open Reservations, pick a view, set Filters and Columns (add the guest name, dates, total and Currency columns), then click the download icon. The CSV is emailed to you (up to 50,000 rows; owner stays are not included). Guesty Lite: Reservations report > download icon, also sent by email.
  • Guests (Pro): Marketing and sales > CRM > Contacts, vertical ellipsis > Download report.
  • Owners and owner statements (Pro): Operations > Portfolio > Owners, and Accounting > Owner accounting > Owner statements.
  • Message automations and saved replies: no export, copy them into a document. Guesty Lite also recommends saving the signed check-in forms.
  • Your Airbnb login email: if your Airbnb account uses a Guesty integration address (ending in @user.guesty.com), change it in Airbnb (Personal info > email address > Edit) so Airbnb keeps reaching you after you leave.

Also have these ready:

  • Your Airbnb login for the account that owns the listings (not a co-host account).
  • Your Booking.com extranet access, with the phone that receives the extranet security codes.
  • A Nowistay account: sign up at app.nowistay.com. Synchronization with your booking platforms and the CSV booking import are part of the AI Channel Manager plan.

Things to know before migrating

  • Airbnb fees: Airbnb applies the host-only fee (about 15.5%) to accounts connected to a channel manager. Coming from Guesty, your account is most likely already on it, so nothing changes. If not, the Rate Adjustment setting in Nowistay lets you raise your Airbnb prices to keep the same net revenue.
  • Your calendar is managed from Nowistay: prices, availability and stay rules are set in the Nowistay calendar and pushed to every channel.
  • Some Airbnb settings become read-only on Airbnb (Smart Pricing, some promotions and stay rules): you manage them from Nowistay.
  • Your bookings stay where they are: reservations live on Airbnb and Booking.com, nothing is cancelled. Upcoming Airbnb and Booking.com reservations are retrieved by Nowistay when you connect those channels.

Details: What changes when you connect Nowistay as your channel manager.

Step 1: Move Airbnb from Guesty to Nowistay

This cuts the connection from Airbnb’s side. It works whatever the state of your Guesty account, and it disconnects all your listings in one go.

  1. Log in to Airbnb with the account that owns the listings, on a computer or in the app.
  2. Click Menu (your profile picture, top right), then Account settings.
  3. Open Privacy.
  4. Under Connected services, find Guesty and click Remove access, then confirm.

Airbnb disconnects every listing that was linked to Guesty at once. Older Airbnb pages call this section Privacy & sharing and Services: it is the same place.

Guesty Lite: inside Guesty Lite, Booking.com and Vrbo depend on your Airbnb connection. Finish your exports before removing Guesty’s access on Airbnb.

Prefer to start from Guesty? In Guesty Pro, open Distribution > the Airbnb thumbnail, disconnect each listing (Connected > Disconnect), then the account (Connected > Disconnect > Yes, disconnect); it takes up to 15 minutes. In Guesty Lite: Channels > Airbnb > Disconnect. A listing disconnected in Guesty stays active and bookable on Airbnb, so connect Nowistay right after.

After a channel manager is disconnected, Airbnb may put some settings back to their default values (minimum stay, maximum stay, closed to arrival or departure). You will check them in Step 6.
1b. Connect Airbnb to Nowistay right away

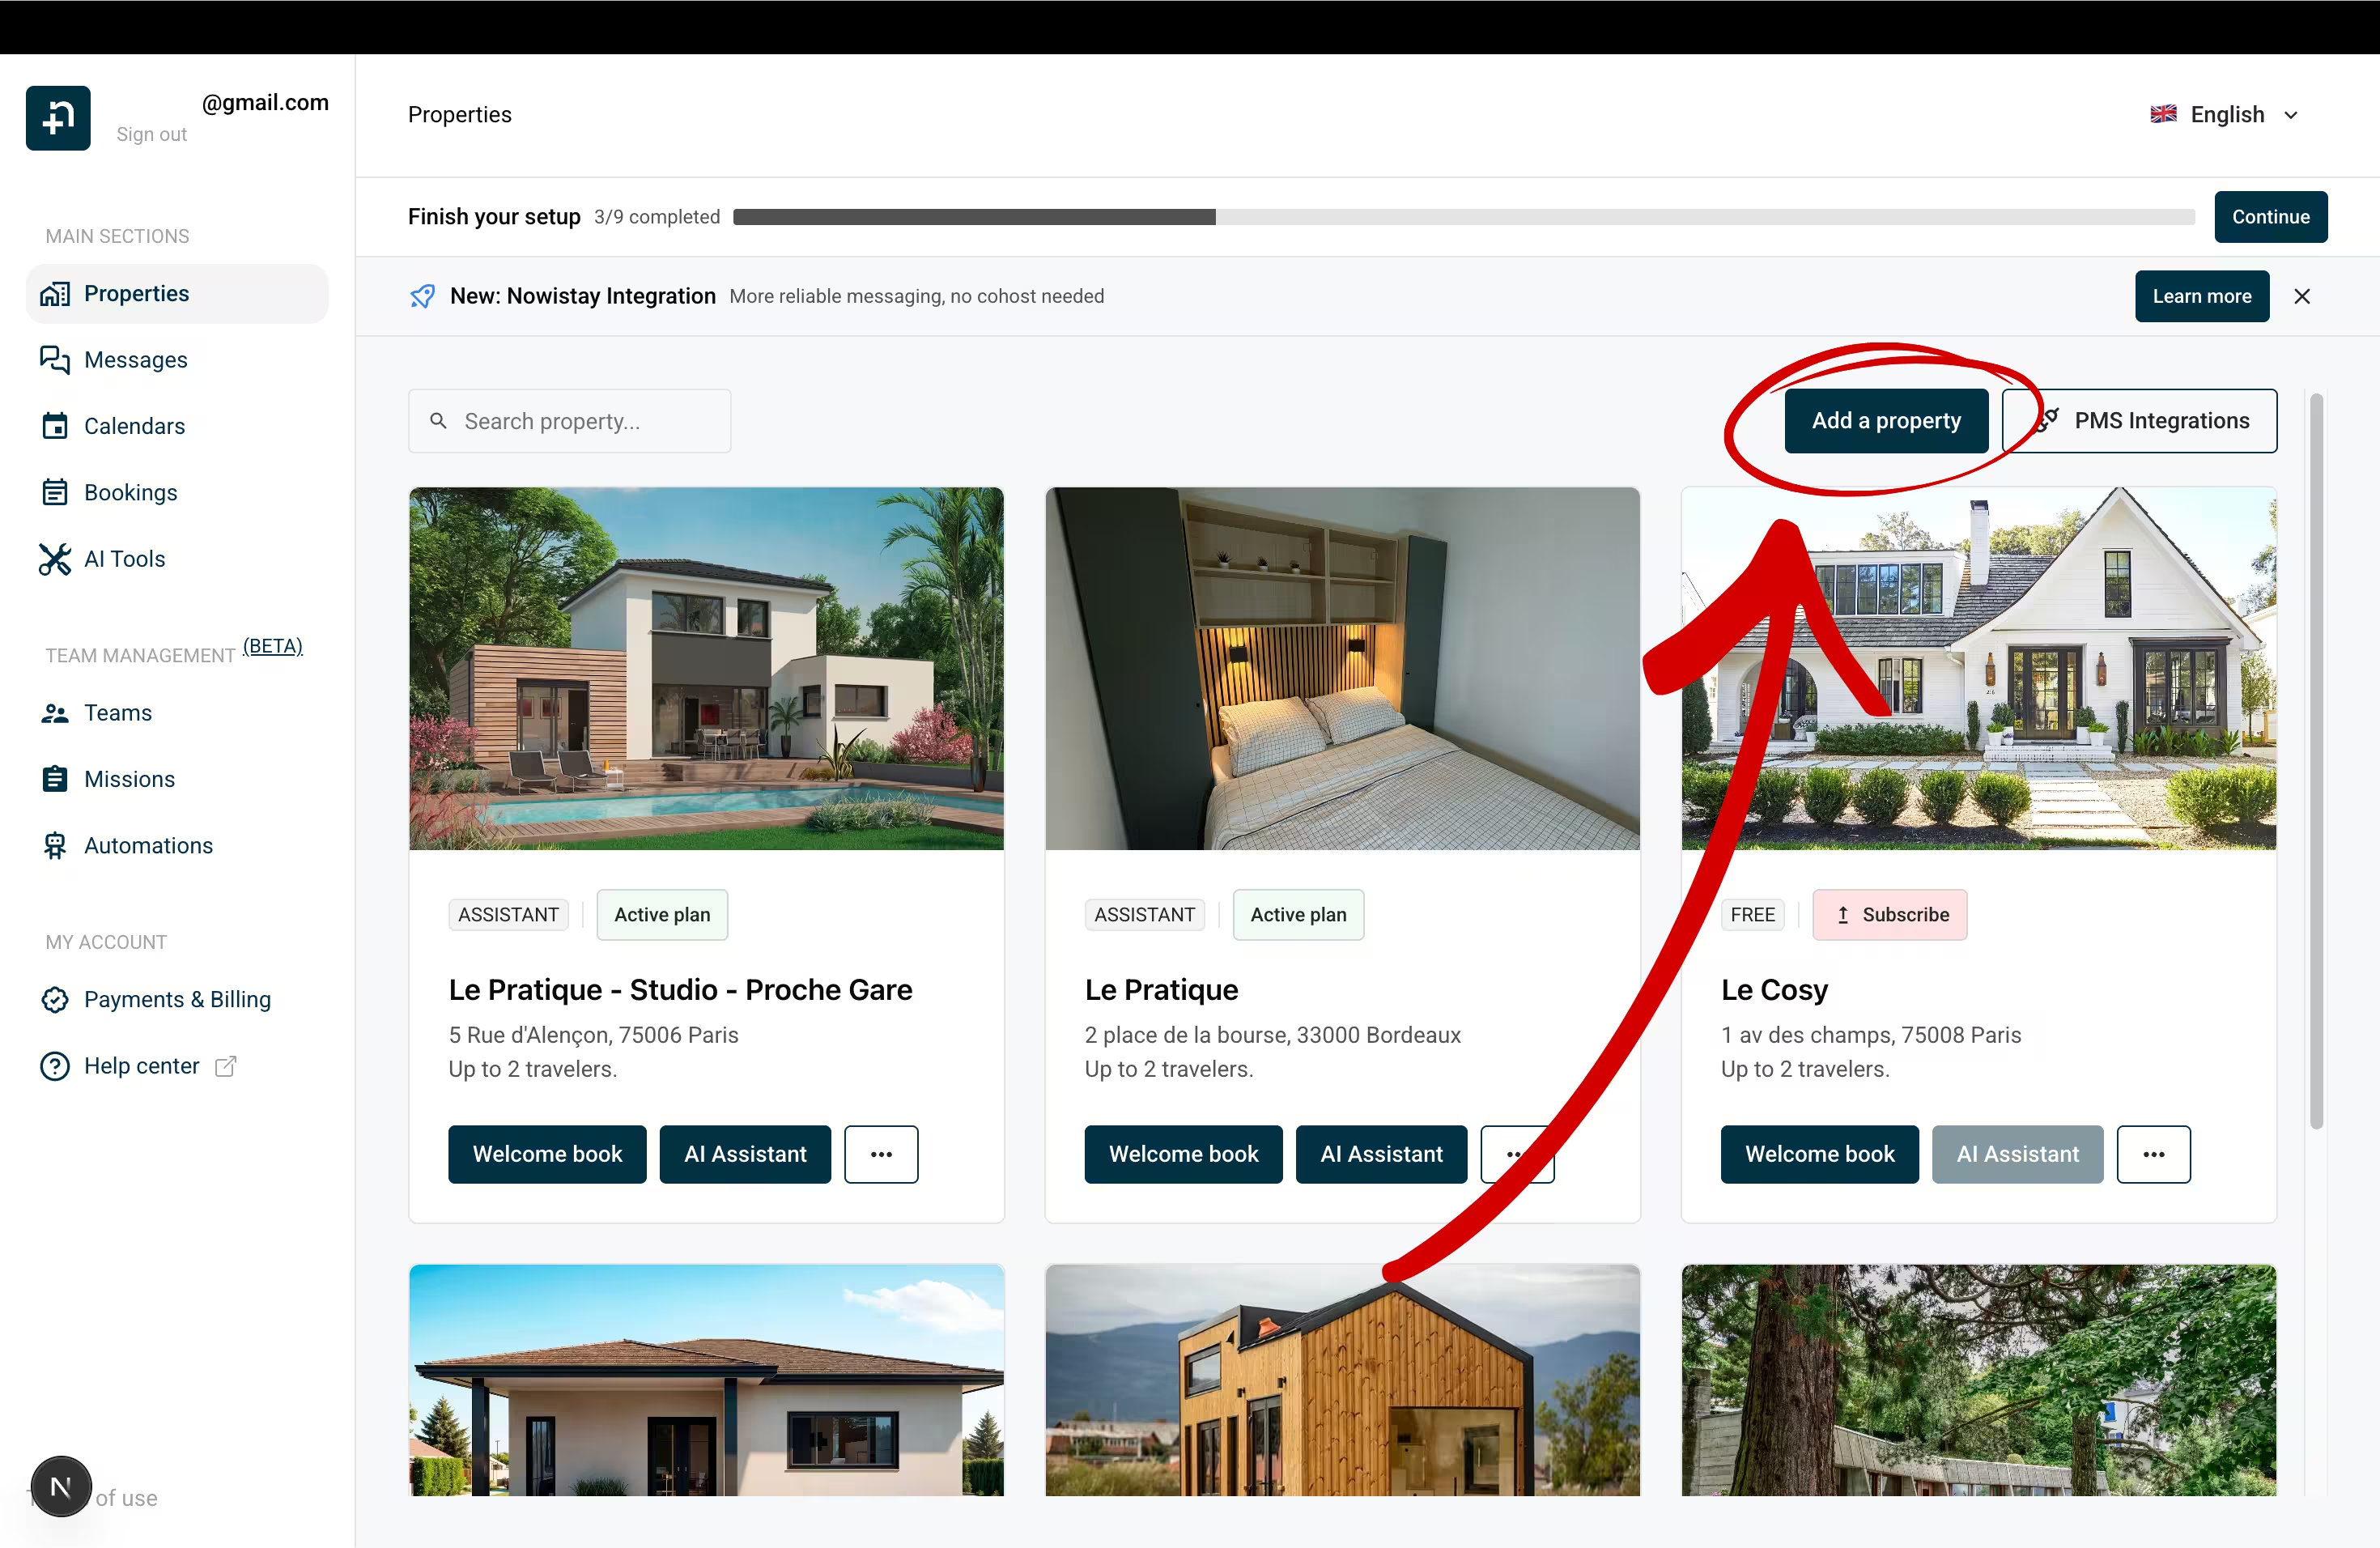
  1. On the Properties page, click Add a property.

Nowistay Properties page with the Add a property button

  1. To How do you manage your bookings today?, answer I use a PMS, then to Do you want to keep your current PMS?, answer No, migrate.
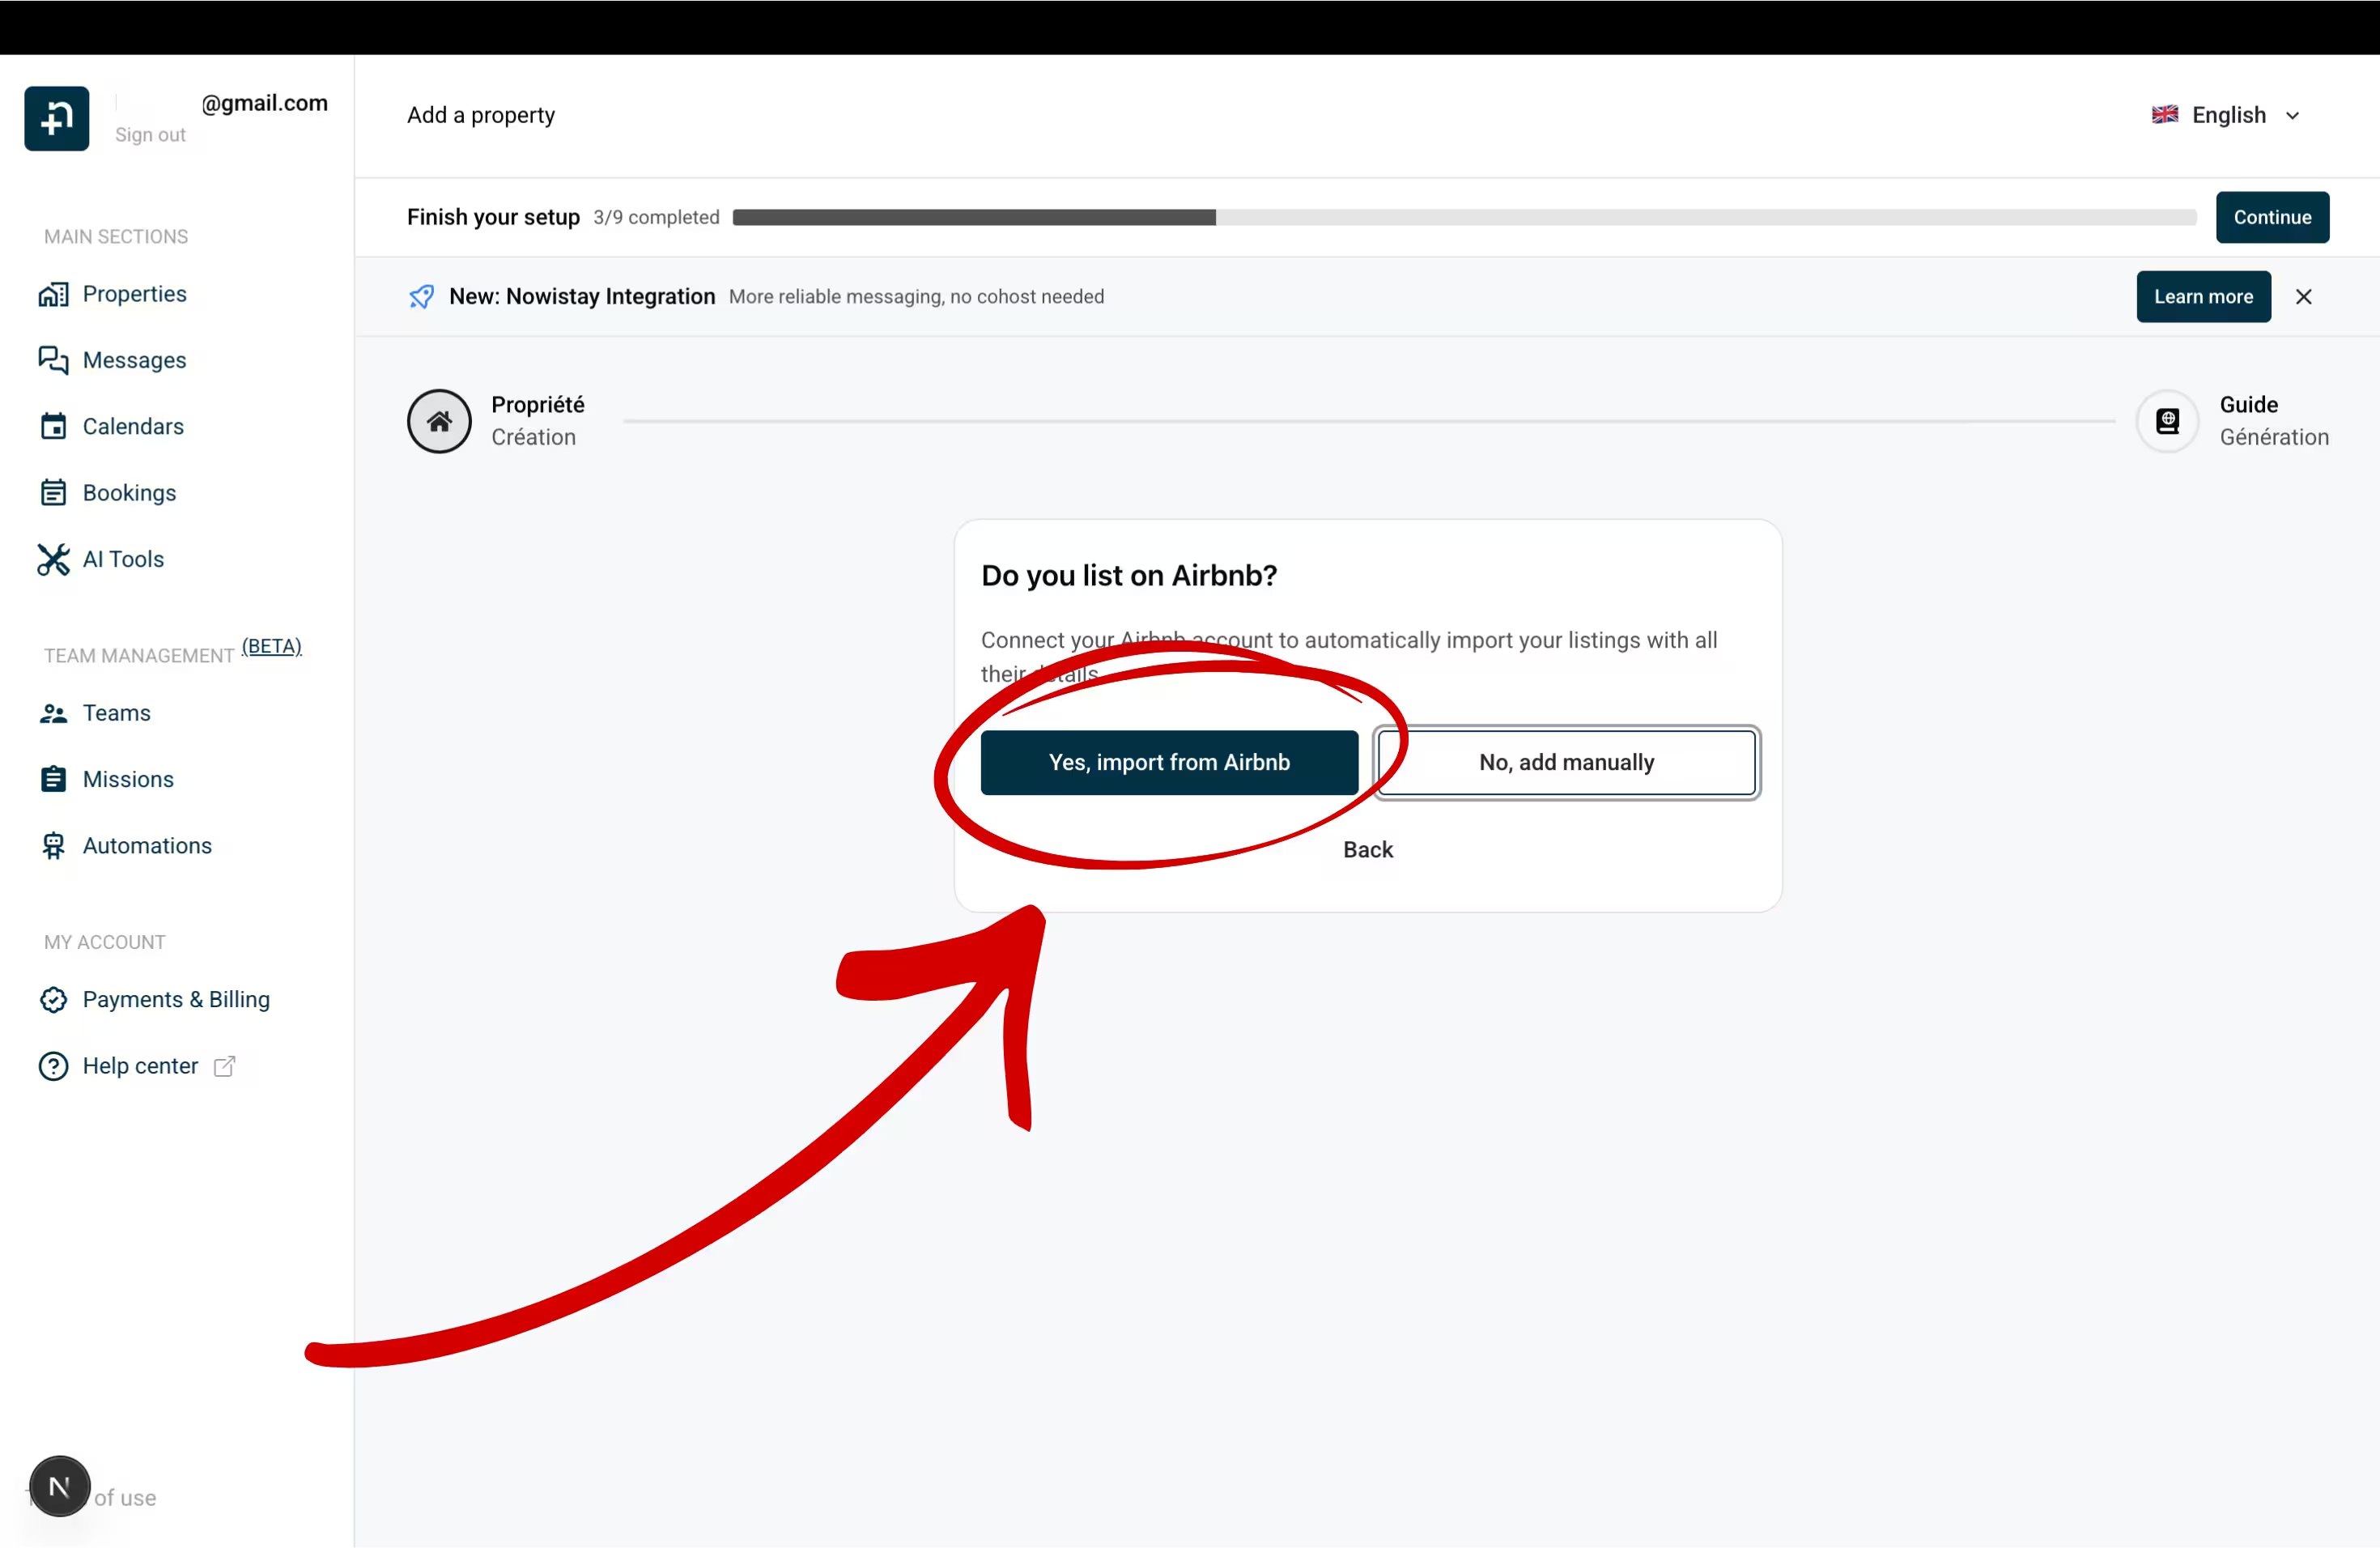
  2. To Do you list on Airbnb?, click Yes, import from Airbnb.

Add a property wizard: Do you list on Airbnb? Click Yes, import from Airbnb

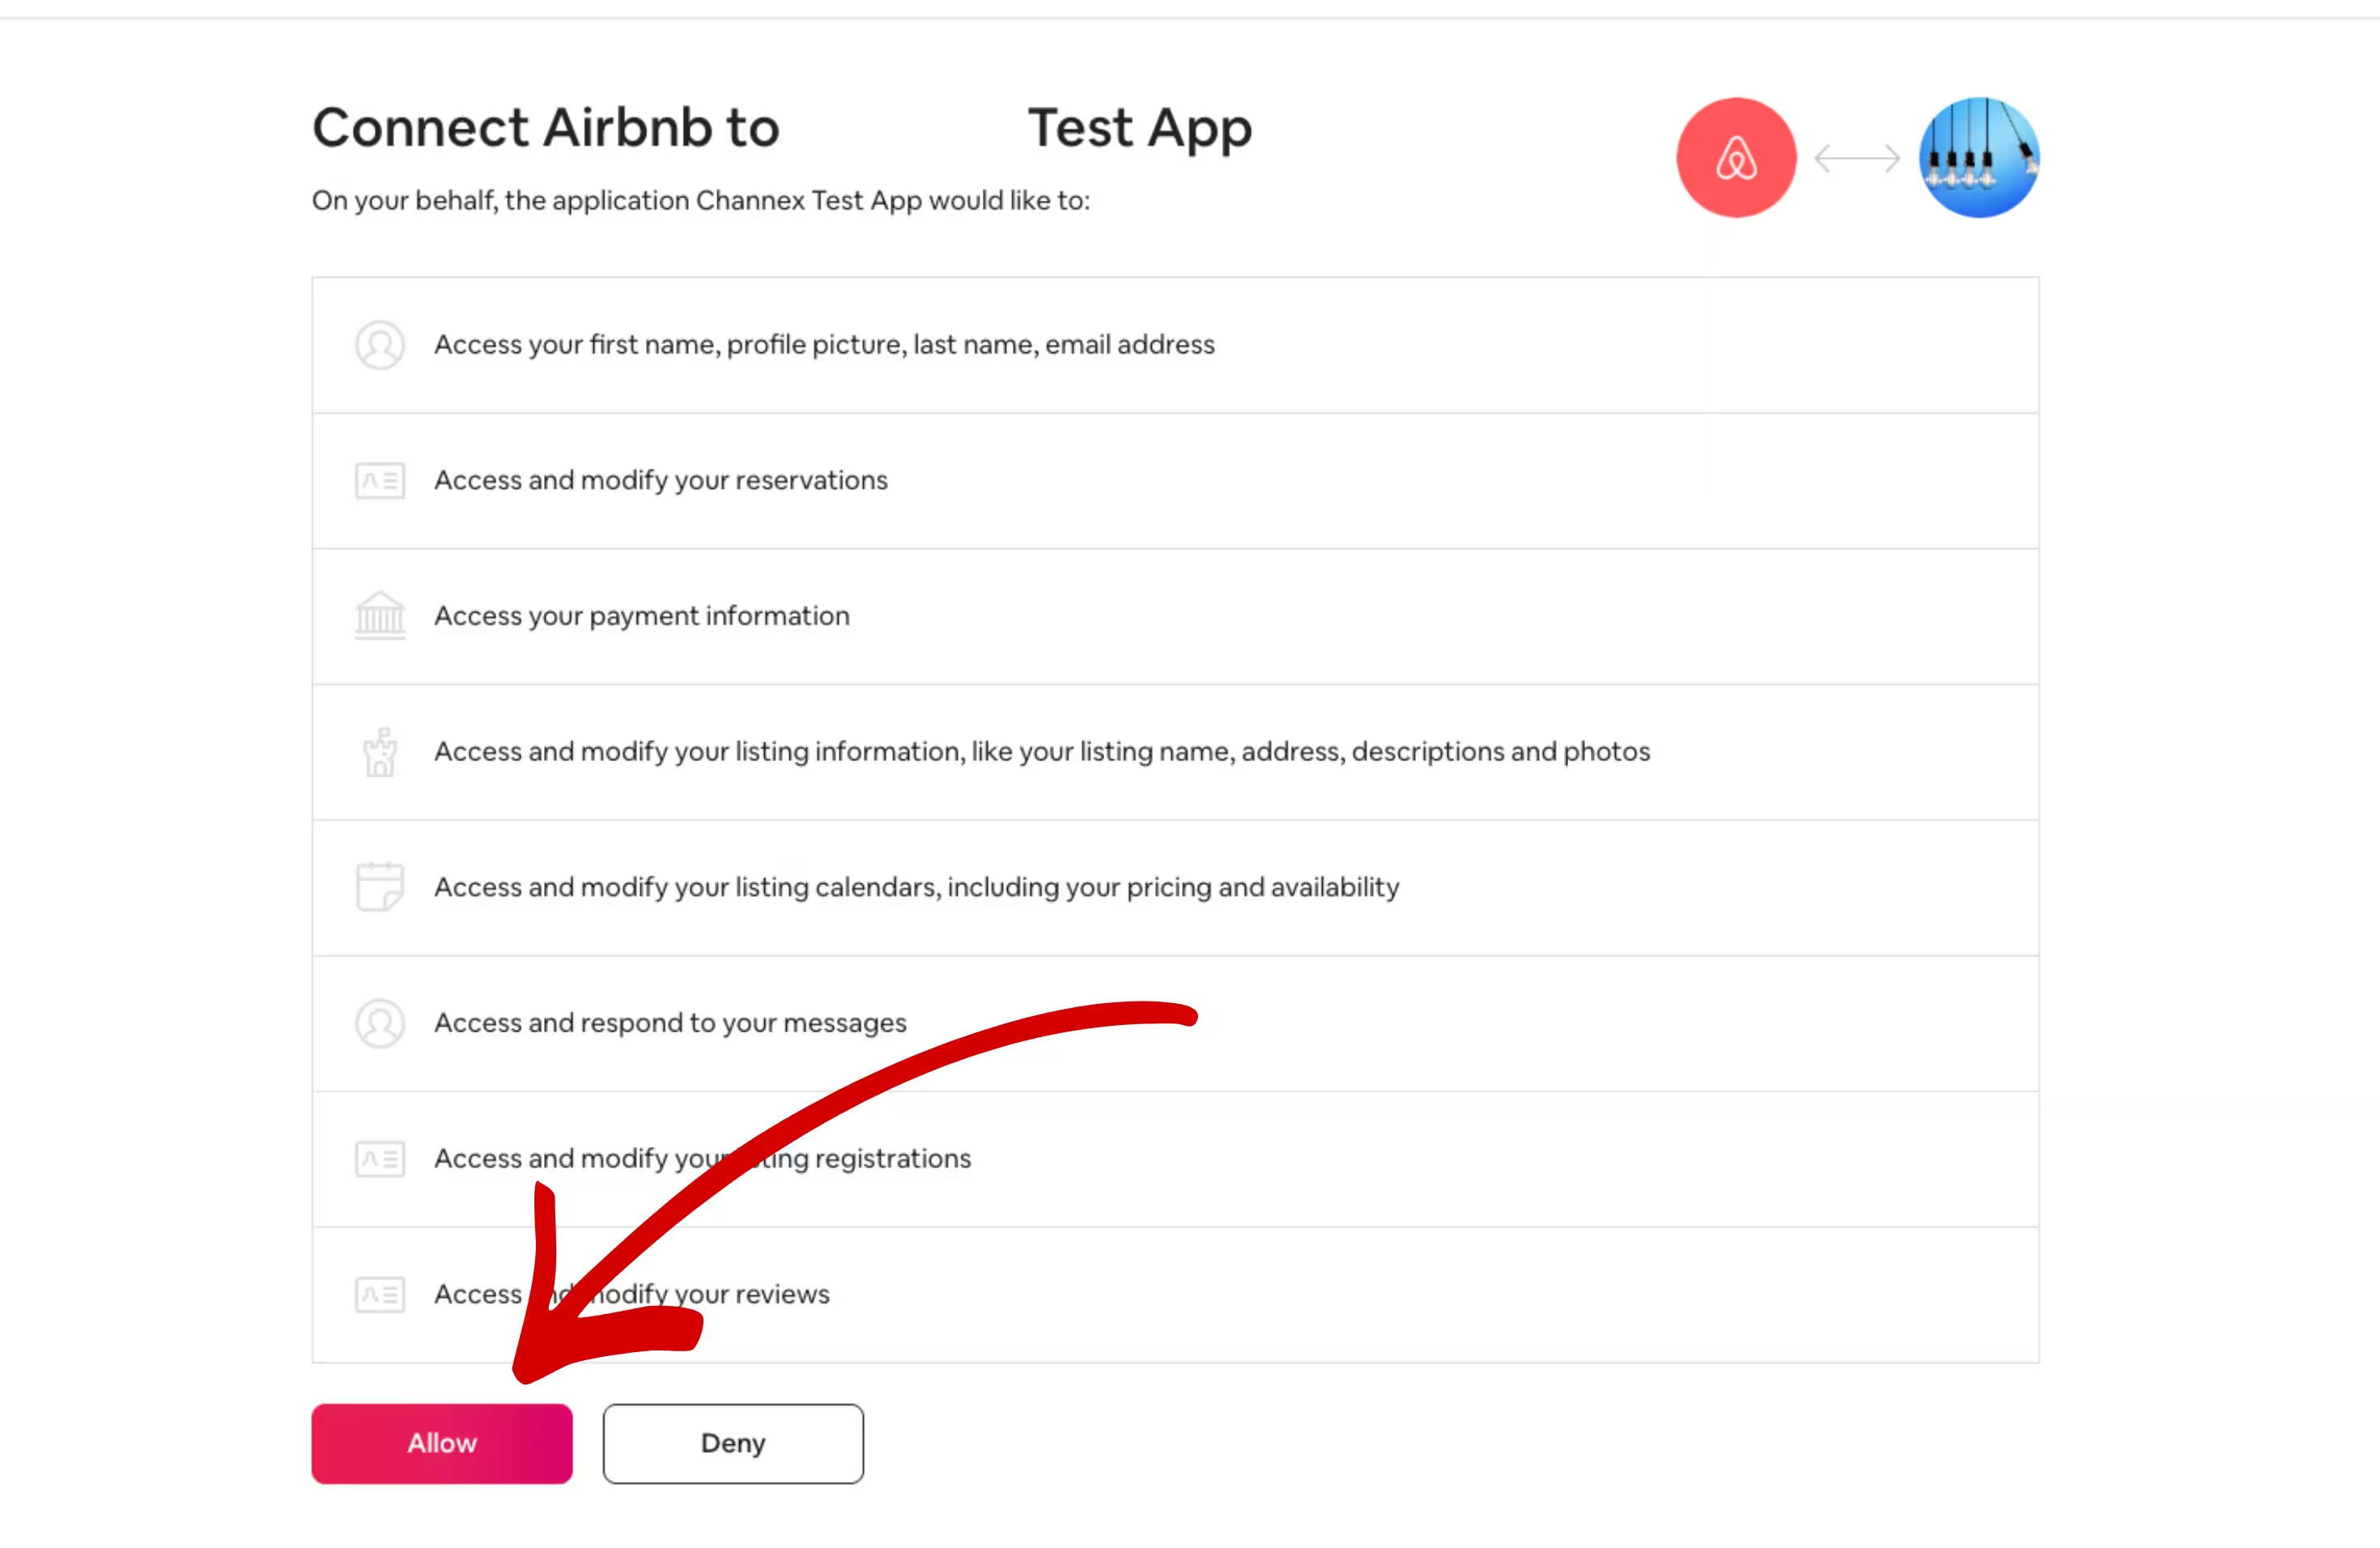
  1. Click Connect with Airbnb (or Use another Airbnb account if another account is already connected). On Airbnb, log in with the owner account of the listings (sign out of any other Airbnb account first) and click Allow. Only a co-host on these listings? Use Ask the owner to authorize.

Airbnb authorization page: click Allow to connect Nowistay

  1. Back in Nowistay, select the listings to import and click Import (the button shows the number of selected properties).

Each property is created with its Airbnb data: name, photos, description, prices and availability. Detailed walkthrough: Connect Airbnb to Nowistay.

Step 2: Move Booking.com from Guesty to Nowistay

2a. Switch the connectivity provider in the extranet

Booking.com lets you go straight from Guesty to the new provider. Your property stays connected to Guesty until the switch is complete, so it never goes unmanaged.

Switch in the extranet before touching Booking.com in Guesty. Guesty notes that disconnecting a Booking.com listing from Guesty removes its room rates in the extranet.

  1. Log in to the Booking.com extranet and open the property.
  2. Write down your Hotel ID: the number shown next to your property name, at the top of every extranet page.
  3. Click Account, then Connectivity provider.
  4. Your current provider is shown as Guesty. Click Switch providers. Do not click Deactivate: it resets your settings and leaves the property without a provider.
  5. Search for the full word Channex (partial words are not recognized) and select Channex.io, Nowistay’s connectivity partner.
  6. Tick the box to accept the terms and confirm (depending on your extranet, the button reads Connect or Yes, I accept). The request then waits for Nowistay: do 2b right away.
Booking.com extranet header showing the Hotel ID next to the property name
Your Hotel ID is shown next to your property name in the extranet header

Repeat this for each Booking.com property, even if you already did it for another one.

2b. Connect Booking.com in Nowistay

  1. On the Properties page, click the … button on the property card, then Synchronization.
  2. Click Add a booking platform (OTA) and select Booking.com in OTA Platform.
  3. Enter your Hotel ID and click Next.
  4. If your Booking.com property has several room types, select the one that matches this Nowistay property in Room Type.
  5. Click Connect.

If Booking.com is the first channel of this property, Nowistay first asks for a Default night rate. Detailed walkthrough: Connect Booking.com to Nowistay.

2c. Clean up in Guesty

Once Channex.io is your active provider: in Guesty Pro, ask Guesty support to disconnect your Booking.com account, as Guesty recommends. In Guesty Lite, go to Channels > Booking.com, then choose Remove in the Status menu and confirm with Remove listing.

Links in messages: Booking.com only lets guests open links that you have allowed in the extranet. If your welcome guide link is not clickable, see Welcome guide links not clickable on Booking.com.

Step 3: Move Vrbo

Vrbo is the channel to handle with the most care when leaving Guesty:

  • Do not disconnect Vrbo in Guesty Pro first. Guesty’s disconnection is irreversible: the listings are deactivated and cannot be republished on the same Vrbo account. Contact Vrbo instead (Contact Us > I’m a Property Manager > Software Integration) and ask them to move your listings from Guesty to your new software; Guesty calls this decommissioning the Guesty connection. Give them your Advertiser ID, shown in Guesty under your Vrbo account.
  • If your listings cannot stay on that Vrbo account, publish them on your own Vrbo account and ask Vrbo support to transfer the reviews from the old listing to the new one (they need both listing numbers, the old one inactive and the same address).
  • Guesty Lite connects Vrbo with your own Vrbo login: disconnect it under Actions > Disconnect (up to 24 hours). Guesty notes that removing a previous software from Vrbo can take up to two weeks.

Then connect Vrbo in Nowistay: Synchronization > Add a booking platform (OTA) > Vrbo, enter your Vrbo username or email and Vrbo password, click Next, choose the phone number for the SMS code, click Request verification code, enter the code and click Verify code, then select your listing and click Connect. Vrbo does not share bookings made before the connection: add them with the CSV import (Step 5). Guest messaging is not available through Vrbo, so reach Vrbo guests by email or WhatsApp. Detailed walkthrough: How to connect your Vrbo listing.

Step 4: Move Expedia

Guesty is set as provider in Expedia Partner Central, and a Guesty integration email is invited there as a Reservation user. Switch the provider to Nowistay as below and connect Expedia in Nowistay on the same day: Guesty notes that a room disconnected in Guesty and not linked again within 24 hours is deactivated by Expedia. Then remove the Guesty user from Partner Central.

To switch Expedia to Nowistay: in Expedia Partner Central, select the property, go to Rooms and Rates > Connectivity Settings, click Change Provider, search for Channex, click Next, then confirm with Change provider. Make sure Channex manages both rates and availability and booking retrieval. If Connectivity Settings is missing, open a ticket with Expedia of type Room, Rates and Availability. Then, in Nowistay: Synchronization > Add a booking platform (OTA) > Expedia, enter your Expedia Hotel ID, choose the Minimum stay rule (Arrival or Through), select the room type and click Connect.

Step 5: Import your direct bookings from Guesty

Upcoming Airbnb and Booking.com reservations arrive in Nowistay by themselves when you connect those channels. What does not come back on its own: direct bookings and bookings taken by phone or email in Guesty, Vrbo bookings made before the connection, and owner stays. Import them from a CSV file so your calendar is complete and no one can book those nights again.

  1. Take the bookings file you exported from Guesty (see Before you start). Guesty only exports the columns you selected, so check that the guest name, dates, total and currency are in the file. Keep the upcoming bookings that did not come from Airbnb or Booking.com. The importer works one property at a time, so make one file per property if needed.
  2. Wait until your Airbnb and Booking.com reservations show in the Nowistay calendar.
  3. In Nowistay, go to Bookings, click the … button, then Import as CSV.
  4. Choose the Property, select your file and click Analyze.
  5. Match each Nowistay field to a column of your file, or to a Fixed value (handy for the currency or the check-in time). The required fields are Arrival, Departure, First name, Last name, Amount, Currency and Status.
  6. Check the Preview of the result, keep Create cleaning missions for upcoming stays ticked if you want them, then click Import and Confirm import.

Good to know: imported bookings are added as direct bookings and block the nights on all your channels. Duplicates (same reservation number, or same dates and same guest) and upcoming stays that overlap a booking you already have are skipped, so re-importing the same file is safe. Guests do not receive a booking confirmation, but your check-in and check-out messages are scheduled for their upcoming stays. A wrong import can be undone from Import history > Delete & revert. Full guide: Import bookings from a CSV file.

Step 6: Check your calendar and settings

Right after connecting your channels, check that prices and availability are right. Some values may have been reset when Guesty was disconnected.

Your prices and availability

  1. Go to Calendars.
  2. For each property, check the nightly rates for the coming months, the open and closed dates, and the minimum stay (it may have been reset to 1 night). Click a date or a date range to change them.

Markup on Airbnb prices: when you connect Airbnb, Nowistay copies your current Airbnb prices into its calendar. Guesty recommends adding a markup on Airbnb prices to offset Airbnb’s fee: check whether you had one. If your Airbnb prices included a markup, those marked-up prices became your base prices and would also be sent to your other channels: lower your base prices in the calendar, then add the markup back for Airbnb only with the Rate Adjustment setting (below).

Guide: How to manage availability and prices from the calendar.

Your property settings

On the Properties page, click … then Property infos, and check Default night rate, Earliest arrival time (check-in), Latest departure time (check-out), the default minimum and maximum number of nights and the Cut-off time. Click Save.

Airbnb availability rules and rate adjustment

In Synchronization, click the gear icon (Channel settings) on your Airbnb connection:
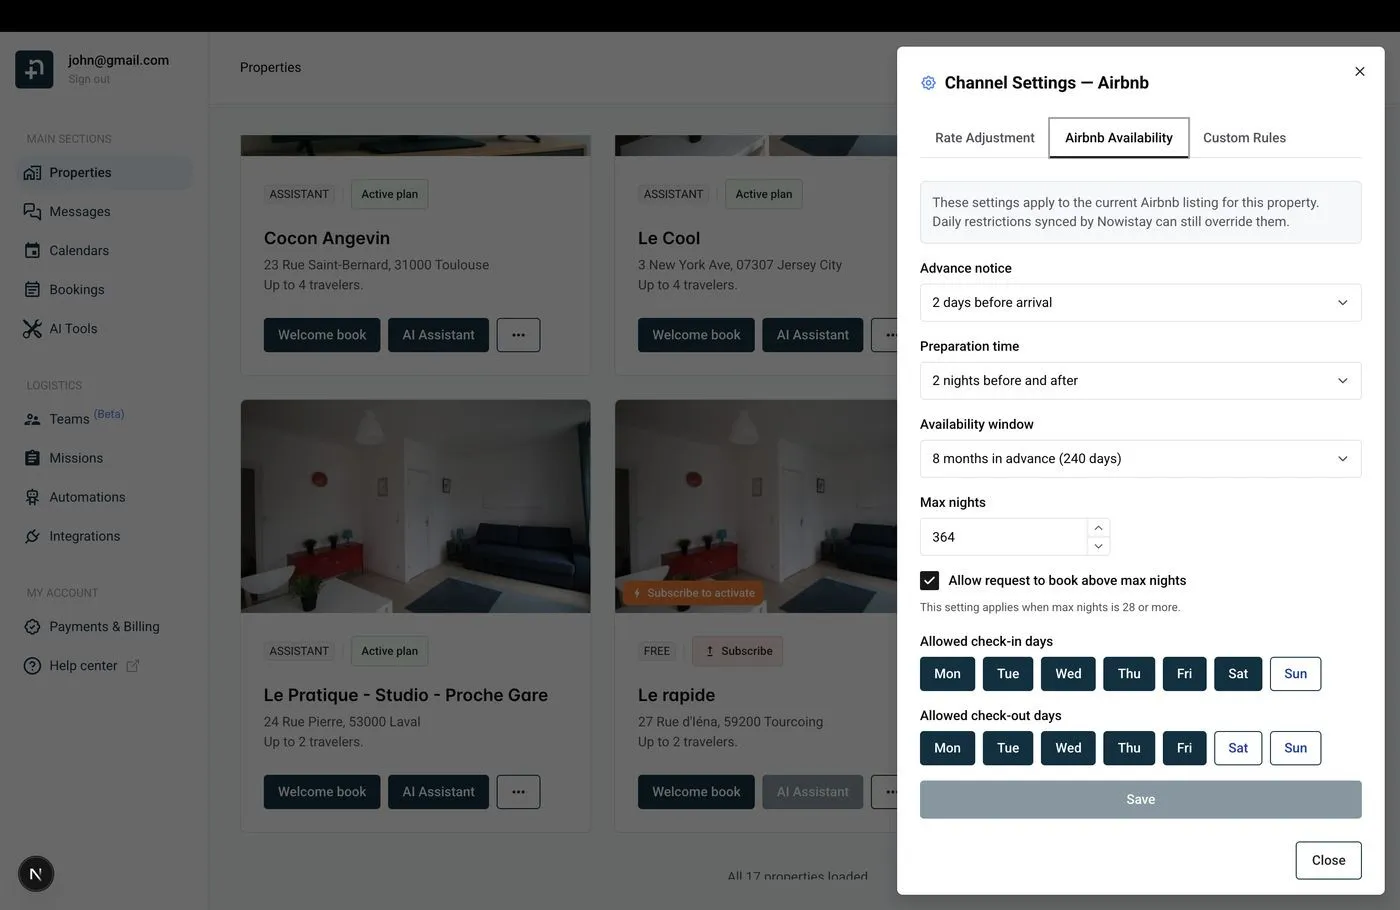
  • Airbnb Availability tab: Advance notice, Preparation time, Availability window, Max nights, Allowed check-in days and Allowed check-out days, then Save.
  • Rate Adjustment tab: a percentage applied to the prices sent to this channel only (for example +15% on Airbnb), then Save. Booking.com, Vrbo and Expedia have the same tab.
Channel Settings for Airbnb with the Airbnb Availability tab
The Airbnb Availability tab of the Channel Settings

Guide: Airbnb availability settings.

Step 7: Set up your welcome guide and AI co-host

Nowistay then helps you create your welcome guide, the digital guest handbook the AI co-host uses to answer questions. Let the AI generate it from your Airbnb listing and your PDF documents, copy a guide from another property, or start from scratch. Paste in what you used to send from Guesty: arrival instructions, Wi-Fi, house rules, parking, local tips. Your AI co-host then answers guests on Airbnb, Booking.com, Expedia, WhatsApp and email, 24/7, from the first inquiry. Guide: Create your digital welcome guide with AI.

Step 8: Recreate your automated messages

Guesty Pro keeps automations under Operations > Front desk > Message automation, and saved replies in each property’s Saved replies. In Guesty Lite: Operations > Automated messages. Neither can be exported: copy the text, the When should this be sent setting and the conditions of each one.

Create them in Nowistay

  1. Go to Automations, then on the Guest Messages row click Manage messages.
  2. Click Add message, or Generate with AI to get a ready-made set you can edit.
  3. Choose the Trigger event: Booking Confirmed, Check-in, Check-out or Manual.
  4. Set Timing (hours) and choose Before the event or After the event. Check-in and check-out timings count from the check-in or check-out time of the stay.
  5. Paste the Subject and Message body from Guesty, then replace the placeholders with Nowistay variables (list below), using Insert variable.
  6. Under Advanced options, Apply to bookings from limits a message to Airbnb, Booking.com, Vrbo, Expedia or Direct booking.

Nowistay sends each message in the guest’s language: add languages to a template and use Translate from default to translate it with AI.

Replace your Guesty placeholders

Guesty and Nowistay both use double braces, only the names change.

  • Guest first name: {{guest_first}} → {{guest_first_name}}
  • Guest full name: {{guest}} → {{guest_full_name}}
  • Number of guests (Nowistay counts adults): {{adults_count}} or {{guests_count}} → {{guest_count}}
  • Number of children: {{children_count}} → {{number_of_children}}
  • Check-in date: {{checkin}} → {{arrival_date}}
  • Check-out date: {{checkout}} → {{departure_date}}
  • Check-in time: {{checkin_time}} → {{check_in_time}}
  • Check-out time: {{checkout_time}} → {{check_out_time}}
  • Number of nights: {{nights_count}} → {{number_of_nights}}
  • Listing name: {{listing}} or {{listing_nickname}} → {{property_name}}
  • Address: {{listing_address}} → {{property_address}}
  • Confirmation code: {{confirmation_code}} → {{reservation_number}}
  • Amount (Nowistay gives the booking total): {{total_paid}} → {{booking_amount}}
  • Currency: {{currency}} → {{currency}}
  • Door code: {{listing_door_code}} or {{guest_access_code}} → {{smartlock_code}}

Nowistay also offers {{arrival_day_name}}, {{days_to_checkin}}, {{host_first_name}}, {{whatsapp_link}}, {{identity_check_link}} (guest identity verification) and {{deposit_payment_link}} (security deposit). Wi-Fi codes, parking details and other fixed property information belong in your welcome guide, or in property variables you can insert from the variable picker.

Match your Guesty timing

  • Guesty Booking confirmation → Nowistay Booking Confirmed, After the event, 0 hours
  • Guesty 1 day before check-in → Nowistay Check-in, Before the event, 24 hours
  • Guesty 1 day after check-in → Nowistay Check-in, After the event, 24 hours
  • Guesty before or after check-out → Nowistay Check-out, Before the event or After the event, in hours

Example: to send a message at 10:00 two days before arrival with a 16:00 check-in, choose Check-in, Before the event, 54 hours.

Then deactivate your Guesty automations so guests don’t receive messages twice.

Guide: How to set up automated guest messages.

Step 9: Reconnect your dynamic pricing

PriceOptimizer: turn it off once your channels have moved, because turning it off restores your previous prices (Pro: Marketing and sales > Revenue management > PriceOptimizer, turn off Suggested promotions, then the PriceOptimizer on toggle; Lite: PriceOptimizer menu). With Guesty Lite’s annual OptiLite bundle, the commission on reservations created while it was active is still charged. PriceLabs and other tools: Integrations > Marketplace > the partner > Disconnect, then in Guesty Pro Integrations > OAuth applications > Delete. This can take 24 hours and does not stop the partner’s own billing.

To connect PriceLabs to Nowistay: go to Integrations, open the Pricelabs card, click Configure then Generate Key and copy the key. In PriceLabs, click Add Your Listings, select Channex, paste the key and click Connect. A property appears once it is on Nowistay PMS with at least one connected channel. Your PriceLabs strategies keep working, only the connection changes. Guide: How to connect PriceLabs for dynamic pricing.

Step 10: Reconnect your smart locks

In Nowistay, go to Integrations > Smart locks and click Connect on your brand: Nuki, igloohome, Tedee, TTLock, Homeit, and the Premium connection for Schlage, Yale, August and KeyNest. Nowistay creates a code for each booking, valid from check-in to check-out, and sends it with the {{smartlock_code}} variable.

With Guesty Locks Manager (Operations > Field ops), unlinking a property cancels the guest codes already scheduled. Connect your locks in Nowistay first, check that your upcoming bookings have a Nowistay code, then unlink them in Guesty.

Step 11: Replace your Guesty booking website or widget

  • Domain: ask Guesty to disconnect your domain before you delete the website; you keep ownership until the end of the registration period. Free guesty.site addresses disappear with the site.
  • Guesty Pro: Distribution > Guesty Websites > ellipsis > Delete site (then contact Guesty to stop the website billing), and Guesty Booking Engine > ellipsis > Delete booking engine > Delete engine.
  • Guesty Lite: Channels > Booking website > ellipsis > Delete Booking Website.

To take direct bookings with Nowistay: go to Integrations > Direct Booking > Configure, connect your Stripe account (Connect Stripe Account), click Create widget (Single property or Multiple properties), then copy the Embed code and paste it where the old widget was. In the widget settings, choose Full payment or Split payment, and add your taxes and discounts. The widget works on WordPress, Webflow, Wix, Squarespace or plain HTML. Guide: How to set up direct booking on your website.

Step 12: Cancel your Guesty subscription

Do this last, once Airbnb, Booking.com, Vrbo and Expedia all show as connected in Nowistay and your direct bookings are imported. Disconnecting channels does not stop Guesty billing: you have to cancel.

  • Guesty Pro works with a contract and has no cancel button: you contact Guesty with your account details. Read your contract first. Guesty’s standard terms set a first term of 13 months, renewed for 12 months unless you send a written notice of non-renewal at least 30 days before the end of the term, with an early termination fee if you leave before. Guesty also states that the contract stays in effect while listings are not deactivated.
  • Guesty Lite: on a computer, go to Account > Guesty billing > Overview > Cancel my subscription. You keep access until the end of the billing period, and fees are not refunded.

What happens to your Guesty data?

  • Your bookings on Airbnb, Booking.com, Vrbo and Expedia stay on those platforms: nothing is cancelled, and upcoming ones are managed from Nowistay.
  • Your reviews and your listing history stay on each platform.
  • Guesty Lite: you lose access to your data once the account is deactivated. Guesty’s Lite terms let you request a copy in writing up to 6 months after termination if your fees are paid.
  • Guesty Pro: export everything before the end of your contract. To have your personal data deleted, contact Guesty support after cancelling.

Ready to Put Your Rental on Autopilot?

Join 300+ property managers who save hours every week with AI-powered guest communication.